Management
●
August 4, 2025
●
8 minuti di lettura
How to Annotate on Google Meet
Con la funzione di annotazione di Google Meet, puoi evidenziare punti chiave, abbozzare idee e guidare visivamente il tuo pubblico.
Ma c'è un problema: l'annotazione in Meet è una novità. Non tutti sanno come usarla.
In questa guida, imparerai come annotare in Google Meet passo dopo passo
È possibile annotare durante le chiamate Google Meet?
Sì, ora puoi annotare direttamente all'interno di Google Meet. Questa funzione ti permette di disegnare, digitare e contrassegnare lo schermo condiviso in tempo reale.
L'annotazione è disponibile nell' app desktop di Google Meet e nel browser Chrome versione 124 o successiva.
Se usi Android, puoi annotare quando condividi l'intero schermo.
Al momento, il supporto iOS è limitato, ma Google ci sta lavorando.
Se non vedi gli strumenti di annotazione, assicurati di utilizzare un browser o un dispositivo supportato.
A cosa serve
Puoi annotare su:
- Documenti
- Diapositive
- Siti web
- Qualsiasi contenuto dello schermo che condividi
Funziona al meglio in demo dal vivo, sessioni di formazione o riunioni collaborative dove gli elementi visivi sono importanti.
Come configurare l'annotazione in Meet
Pronto per annotare in Google Meet?
Ecco come iniziare in pochi clic.
Passaggio 1 – Avvia Google Meet
Partecipa alla tua riunione come di consueto in Google Chrome o l' app desktop di Google Meet.
L'annotazione funziona solo in questi ambienti, quindi evita di usare Safari o Firefox.
Assicurati di utilizzare Chrome versione 124 o superiore.
Puoi verificarlo digitando chrome://settings/help nella barra del tuo browser.
Passaggio 2 – Condividi il tuo schermo
Fai clic su Presenta ora in fondo alla finestra di Meet.
Puoi scegliere di condividere:
- L'intero schermo
- Una finestra
- Una scheda specifica di Chrome
Per usare l'annotazione, qualsiasi di queste opzioni funziona. Basta scegliere ciò che devi mostrare.
Una volta avviata la condivisione, la barra degli strumenti in fondo allo schermo cambierà.
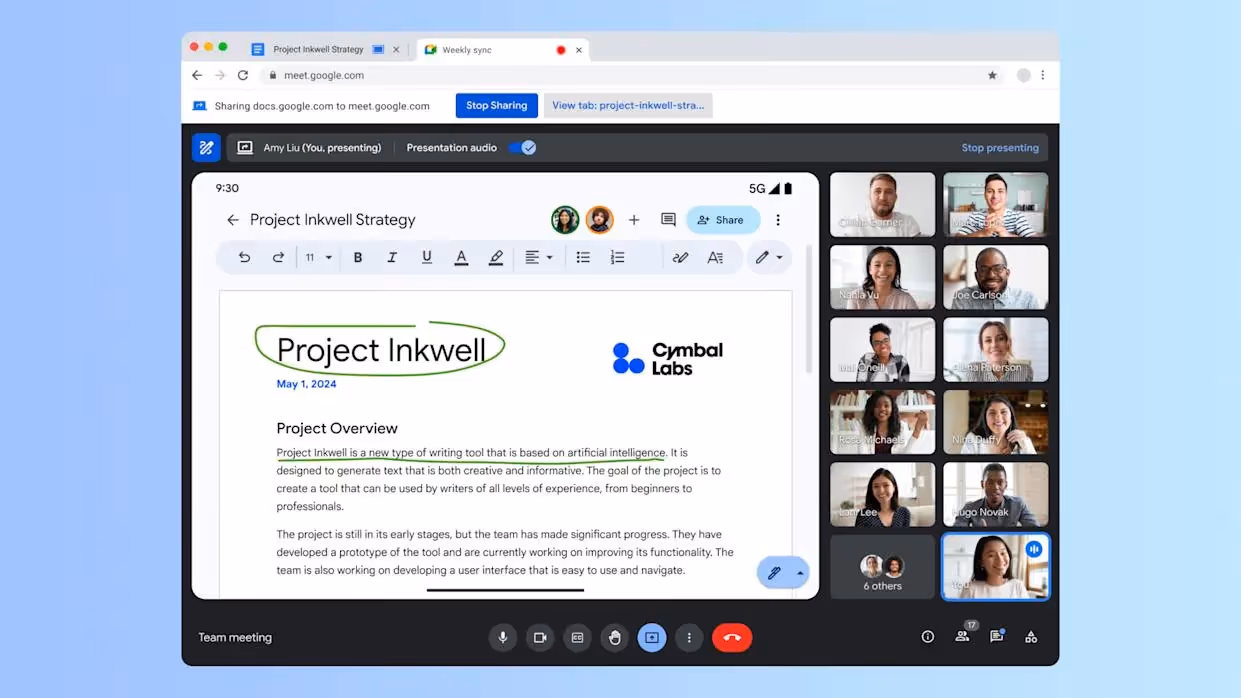
Passaggio 3 – Fai clic su Annota
Nella tua nuova barra degli strumenti, trova l' icona della penna denominata Annota.
Fai clic su di essa e vedrai apparire i tuoi strumenti di annotazione.
Ora puoi disegnare, digitare o aggiungere note sullo schermo.
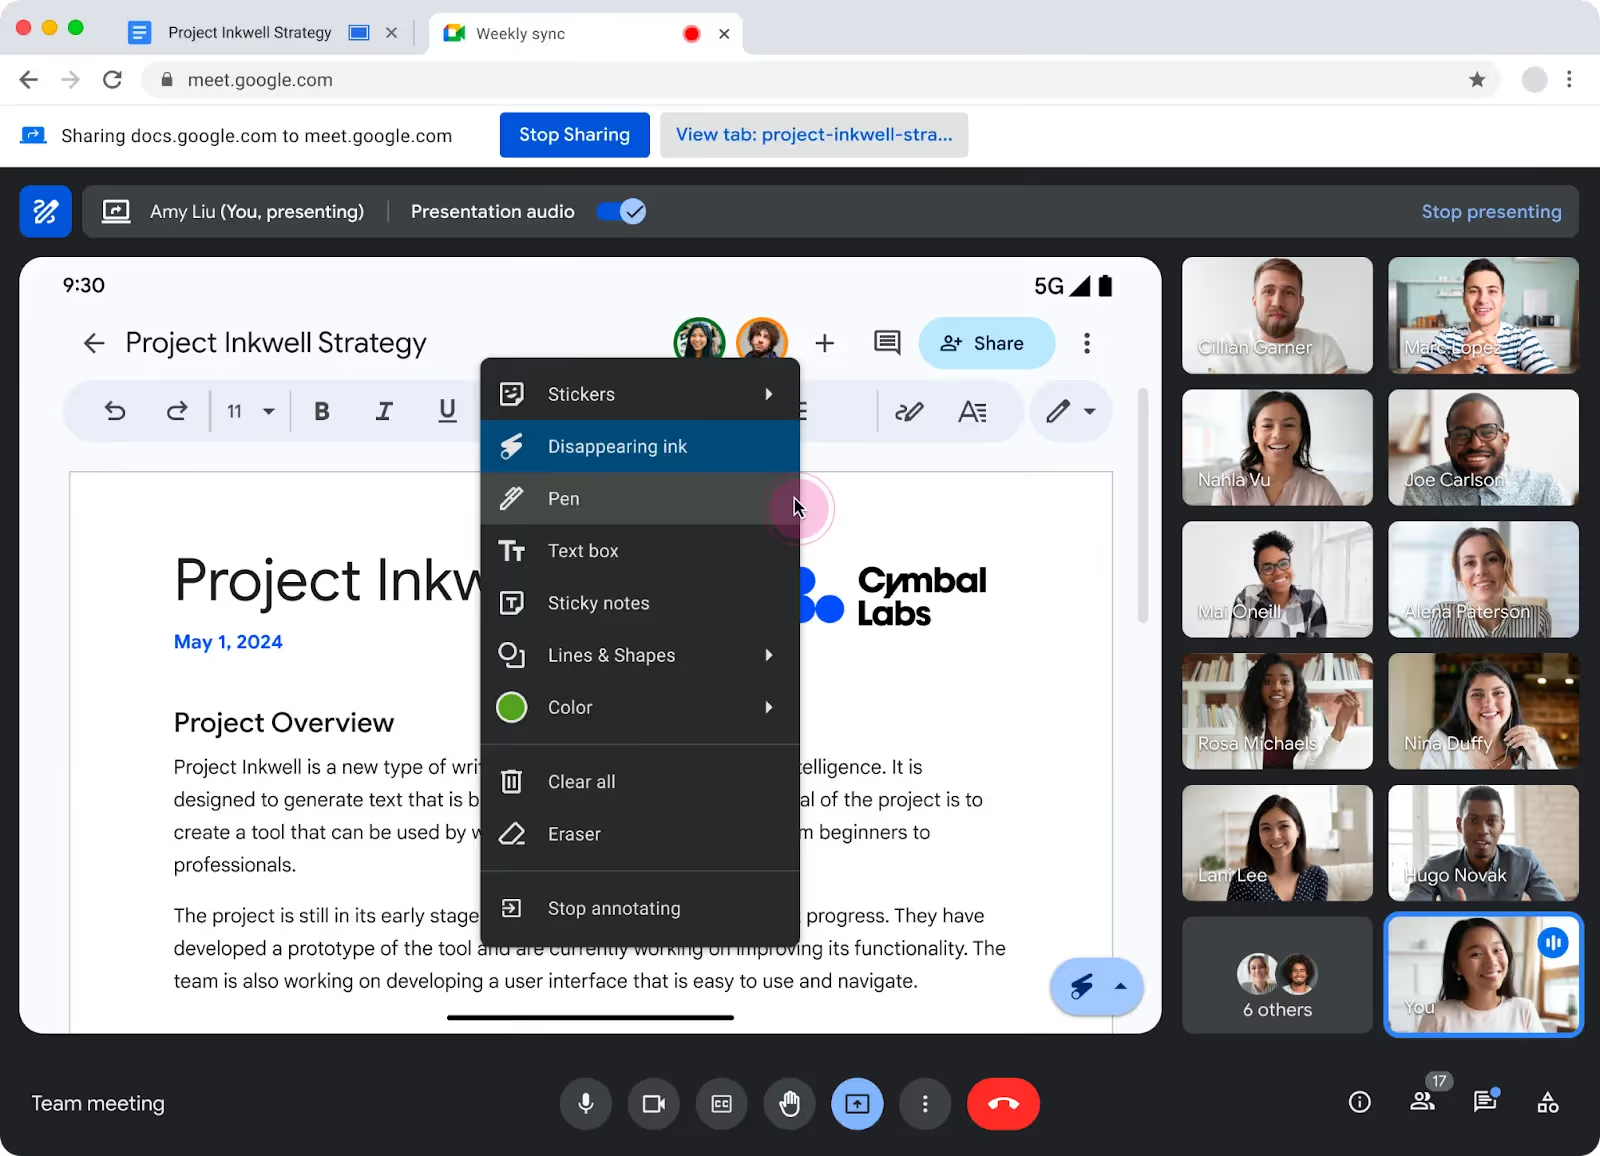
Passaggio 4 – Usa gli strumenti
Hai diversi strumenti tra cui scegliere:
- Penna – Disegna a mano libera con colori diversi
- Inchiostro a scomparsa – I segni svaniscono dopo pochi secondi
- Forme – Aggiungi linee, frecce o riquadri per evidenziare aree
- Testo – Digita direttamente sullo schermo
- Nota adesiva – Aggiungi brevi commenti in riquadri luminosi
- Gomma – Rimuovi segni specifici
- Cancella tutto – Cancella tutto con un clic
Scegli lo strumento che ti serve dalla barra degli strumenti.
Personalizza facilmente colori e spessore della linea.
Passaggio 5 – Aggiungi co-annotatori (facoltativo)
Vuoi che altri annotino con te?
Clicca Persone per aprire l'elenco dei partecipanti.
Trova qualcuno, clicca sui tre puntini accanto al suo nome e scegli Aggiungi come co-annotatore.
Ora possono disegnare con te in tempo reale.
Mantieni il controllo: puoi rimuoverli in qualsiasi momento.
Passaggio 6 – Interrompi l'annotazione
Hai finito di annotare lo schermo?
Clicca Annota di nuovo per uscire dalla modalità di annotazione.
La tua schermata condivisa continua, ma gli strumenti scompaiono.
Ricorda: le annotazioni non sono salvate automaticamente.
Se vuoi conservare il tuo lavoro, fai uno screenshot prima di interrompere.
Troubleshoot Google Meet Annotation
Trying to annotate but it’s not working?
Here’s how to fix the most common problems quickly.
Problem 1 – No “Annotate” button
You’re sharing your screen, but there’s no Annotate icon in your toolbar.
Fix:
Check your browser. You must be using:
- Google Chrome (version 124 or higher), or
- The Google Meet desktop app
Other browsers won’t show annotation tools. Update Chrome if needed. Type chrome://settings/help to check your version.
Problem 2 – Using the wrong device
Annotation doesn’t appear on mobile browsers, Chromebooks, or older devices.
Fix:
Switch to a desktop computer and open Meet in Chrome or the desktop app.
If you’re on Android, you can annotate—but only after sharing your screen in the Meet app. iOS support is limited for now.
Problem 3 – Not sharing your screen correctly
You’re in the call, but the tools still don’t appear.
Fix:
Click Present now, then choose Your entire screen, a window, or a tab.
Once sharing starts, the toolbar updates and Annotate becomes visible.
Tip: If you’re watching someone else’s screen, you can’t annotate. Only the person sharing can draw.
Problem 4 – Co-annotator option missing
You want to let others draw, but you don’t see the option.
Fix:
Click People to open the participant list.
Click the three dots next to their name, then Add as co‑annotator.
Still no option? Try signing out of extra Google accounts and reloading the meeting. Multiple logins can block permissions.
Also, co-annotation is only supported on desktop, not mobile.
Problem 5 – Annotations aren’t showing in recordings
You’re recording your meeting but your drawings are missing from the playback.
Fix:
Google Meet’s built-in recording captures only your shared screen, not your annotations.
If you need to save your marks, take a screenshot during the meeting.
Or, use a tool like Noota to record your full screen—including drawings, voice, and summaries.
Problem 6 – Tools lag or crash
Your annotation tools freeze or delay when you draw.
Fix:
Disable Chrome extensions that interact with Meet or screen sharing.
Try using a clean Chrome profile or incognito mode to test.
Also, restart your browser or computer to clear memory issues.
Noota – Record Everything
Google Meet lets you annotate live.
But once the meeting ends, your drawings disappear.
That’s where Noota helps :
- Real-time video recording and transcription : While you speak, Noota records and transcribes your words in real time.
Everyvdeo sharing and sentence is saved and time-stamped. So you can easily jump to any moment. - Smart summaries : After the meeting, Noota creates a summary for you. You get a visual and written recap—all in one place.
- Share instantly : Noota syncs with your tools—Slack, Notion, ATS, CRM, and more. You can send the summary to your team with one click.
Everyone stays aligned, even if they missed the call. - Privacy and control : You decide when to record and what to save. You can pause, stop, or delete any recording. Your data stays private and secure, with full GDPR compliance.
Want to record your conversations and annotations ? Try Noota for free now.
Conosci l'autore
.webp)
Alexandre è il CEO di Noota. Ha dedicato la sua vita ad aiutare i rappresentanti di vendita e i recruiter a migliorare i loro processi di lavoro.
FAQ
Come attivare l'annotazione su Google Meet?
L'annotazione si attiva condividendo lo schermo e cliccando l'icona della penna nella barra inferiore.
- Disponibile solo su Chrome versione 124 o superiore.
- Funziona con documenti, slide, siti web e contenuti schermo.
- Co-annotatori possono disegnare contemporaneamente in tempo reale.
Quali dispositivi supportano l'annotazione Meet?
L'annotazione è disponibile su desktop e Android, ma con limitazioni su iOS.
- Desktop: Chrome browser e app Google Meet supportati completamente.
- Android: annotazione disponibile quando condividi l'intero schermo.
- iOS: supporto limitato; Google sta sviluppando la funzione.
Annotazione Meet vs. Noota: quale strumento scegliere per riunioni produttive?
Meet richiede annotazione manuale; Noota registra, trascrive e genera note automaticamente in 80+ lingue.
- Meet: annotazioni non si salvano, lavoro manuale, solo visuale durante la call.
- Noota: 6,4 ore/settimana risparmiate, -80% admin, note IA + riepiloghi + azioni automatiche.
- 5000+ team usano Noota per email, CRM e telefonia—Meet non copre questi canali.
Per quali riunioni l'annotazione Google Meet è più utile?
L'annotazione Meet eccelle in sessioni visive dove feedback immediato è critico.
- Demo dal vivo: evidenzia punti chiave e guida l'audience in tempo reale.
- Training collaborativo: disegna idee, aggiungi frecce, spiega concetti visivamente.
- Brainstorming: co-annotatori contribuiscono sketch e note contemporaneamente.
Qual è la miglior app per note automatiche riunioni e ridurre lavoro amministrativo?
Noota registra senza bot, genera note IA e riepiloghi automatici—risparmiando 6,4 ore/settimana per team.
- Registrazione Chrome: cattura Google Meet, Teams, Zoom senza invitare bot.
- Note IA + azioni: trascrive, riassume, estrae task in 80+ lingue automaticamente.
- Integrazione totale: copre riunioni, email, CRM, telefonia in un'unica piattaforma.
Prova Noota gratis — nessuna carta di credito richiesta.