


Registrazione e Trascrizione delle Riunioni
8 min di lettura
Aggiornato il:
Jul 28, 2025
Come annotare su Zoom
Vuoi sapere come funzionano le annotazioni su Zoom? Ecco la tua guida.
Le funzioni di annotazione di Zoom sono potenti, ma facili da trascurare.
Se usate correttamente, possono trasformare una condivisione schermo passiva in una conversazione visiva e interattiva.
In questo articolo imparerai a utilizzare gli strumenti di annotazione integrati di Zoom.
Zoom offre uno strumento di annotazione integrato?
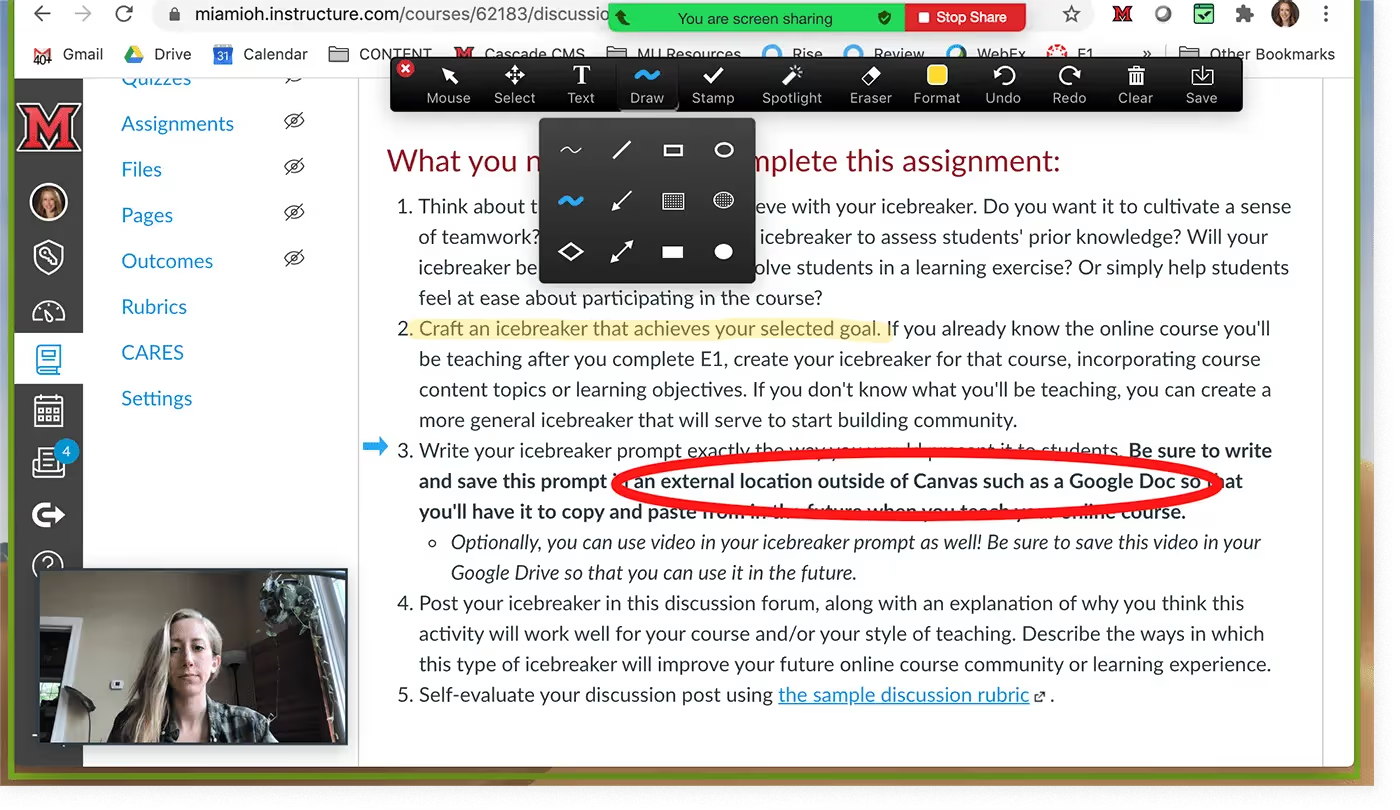
Sì, Zoom include una funzione di annotazione integrata che ti permette di disegnare, evidenziare e commentare direttamente su schermi condivisi o lavagne. È disponibile per host e partecipanti e funziona in tempo reale.
Una volta attivata, l'annotazione diventa un potente strumento di collaborazione visiva. Che tu stia spiegando un documento, fornendo un feedback su un design o guidando un candidato attraverso un compito, gli strumenti sono chiari e facili da usare.
Cosa puoi fare con gli strumenti di annotazione di Zoom:
- Disegnare a mano libera o utilizzare forme come linee, rettangoli e cerchi.
- Aggiungere testo direttamente sullo schermo per etichettare o commentare.
- Evidenziare aree chiave con lo strumento riflettore o l'evidenziatore.
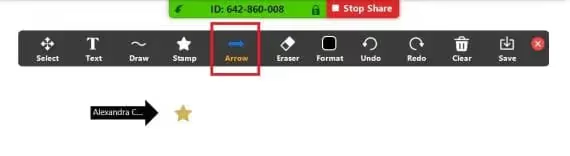
- Usare timbri come segni di spunta, frecce o stelle per fornire un feedback rapido.
- Cancellare, annullare o rimuovere tutte le annotazioni con un solo clic.
- Salvare lo schermo (con o senza annotazioni) come immagine, se il salvataggio è abilitato.
Tutto questo funziona durante la condivisione dello schermo o mentre si utilizza la funzione lavagna.
Chi può aggiungere annotazioni?
Per impostazione predefinita, l'organizzatore della riunione controlla l'accesso alle annotazioni. Gli organizzatori possono consentire o limitare le annotazioni dei partecipanti in qualsiasi momento. È persino possibile disabilitare le annotazioni dopo l'inizio della riunione, il che è utile in riunioni numerose o riservate.
Per abilitare le annotazioni, è necessario modificare le impostazioni nel portale web di Zoom:
- Accedi su zoom.us.
- Vai su Impostazioni > Durante la riunione (base).
- Imposta Annotazione su "Attivato".
- Facoltativamente, disabilita "Mostra nomi degli annotatori" se preferisci modifiche anonime.
Quali dispositivi la supportano?
Le annotazioni di Zoom sono pienamente supportate sulle app desktop per Windows, macOS e Linux. La maggior parte degli strumenti è disponibile anche su iPad. Gli utenti mobile su iOS e Android possono accedere a versioni semplificate della barra degli strumenti (penna, evidenziatore, forme e testo), ma con meno opzioni di personalizzazione.
L'annotazione non è disponibile nella versione di Zoom basata su browser o su Chromebook. Per utilizzare tutte le funzionalità, è necessario il client desktop completo di Zoom.
Come aggiungere annotazioni su Zoom passo dopo passo
Utilizzare gli strumenti di annotazione di Zoom è semplice una volta capito dove trovarli. Che tu stia organizzando una riunione, fornendo feedback o facendo brainstorming dal vivo con il tuo team, ecco come iniziare.
Segui questa guida passo dopo passo per attivare e utilizzare gli strumenti di annotazione di Zoom su desktop e dispositivi mobili.
1. Abilita le annotazioni nelle tue impostazioni
Prima di poter utilizzare gli strumenti, devi assicurarti che siano attivati.
Ecco come fare:
- Accedi al tuo account Zoom su zoom.us.
- Fai clic su Impostazioni nel pannello a sinistra.
- Nella scheda Riunione , scorri fino a Durante la riunione (base).
- Imposta Annotazione su "Attivato".
- (Facoltativo) Disattiva "Mostra nomi degli annotatori" se desideri che le modifiche siano anonime.
Queste impostazioni si applicano a tutte le riunioni future. Se sei l'organizzatore, puoi anche decidere se consentire ai partecipanti di utilizzare le annotazioni in ogni singola riunione.
2. Avvia la riunione e condividi lo schermo
Una volta avviata la riunione:
- Fai clic sul pulsante verde Condividi schermo .
- Scegli la finestra o l'app che desideri condividere.
- Dopo aver avviato la condivisione, sposta il mouse nella parte superiore dello schermo.
- Apparirà una barra dei menu mobile. Fai clic su Annota (vedrai un'icona a forma di matita).
Si aprirà la barra degli strumenti di annotazione.
3. Usa la barra degli strumenti di annotazione
Ecco cosa vedrai e come utilizzare ogni strumento:
- Testo – Fai clic in un punto qualsiasi per scrivere direttamente sullo schermo. Ottimo per etichette o istruzioni.
- Disegna – Usa strumenti a mano libera come penna, linea, freccia, quadrato e cerchio. Ideale per schizzi rapidi o diagrammi.
- Timbro – Aggiungi icone come segni di spunta, croci, frecce o stelle per fornire un feedback visivo immediato.
- Riflettore – Trasforma il cursore in un puntatore laser rosso o in una freccia. Perfetto per guidare l'attenzione.
- Gomma – Rimuovi parti specifiche del tuo disegno.
- Formato – Scegli lo spessore della linea, i colori o la dimensione del carattere.
- Annulla / Ripristina / Cancella – Gestisci le tue modifiche facilmente. Usa Cancella per eliminare tutte le annotazioni in una volta sola.
- Salva – Salva la schermata corrente (con o senza annotazioni) come PNG. Nota: l'organizzatore deve consentire il salvataggio ai partecipanti.
4. Annotazione da dispositivo mobile (iOS / Android)
Utilizzi uno smartphone o un tablet?
- Tocca Condividi contenuto > Schermo.
- Una volta avviata la condivisione, tocca l'icona della matita nella parte inferiore dello schermo.
- Apparirà la barra delle annotazioni mobile.
Strumenti disponibili: penna, evidenziatore, forme, testo, gomma, selezione colore, annulla/ripristina. Su iPad, avrai accesso a ulteriori strumenti come timbri e riflettore.
Consiglio: usa un pennino sui tablet per disegni più precisi.
Domande frequenti sulle annotazioni Zoom
Gli strumenti di annotazione di Zoom sono utili, ma come ogni funzionalità, sollevano qualche dubbio. Ecco le risposte alle domande più comuni, spiegate in modo semplice e chiaro.
I partecipanti possono aggiungere annotazioni durante una riunione Zoom?
Sì, ma solo se l'organizzatore lo consente.
Per impostazione predefinita, solo l'organizzatore può utilizzare le annotazioni. Se desideri che i partecipanti contribuiscano, devi abilitare l'opzione durante la riunione.
Ecco come fare:
- Fai clic su Altro nella barra degli strumenti durante la condivisione dello schermo.
- Seleziona Consenti annotazioni ai partecipanti.
Puoi disattivare questa funzione in qualsiasi momento se la riunione perde il filo o se troppe persone iniziano a disegnare contemporaneamente.
Consiglio: nelle riunioni numerose, per mantenere la chiarezza, consenti le annotazioni solo ai co-organizzatori o ai relatori.
Perché non vedo la barra degli strumenti per le annotazioni?
Se la barra degli strumenti per le annotazioni non è visibile durante la condivisione dello schermo, verifica quanto segue:
- Stai utilizzando l' app desktop di Zoom, non la versione browser.
- L'annotazione è abilitato nelle impostazioni di Zoom.
- Sei l' organizzatore o hai il permesso di aggiungere annotazioni.
- Hai avviato la condivisione dello schermo o aperto una lavagna. La barra degli strumenti appare solo durante la condivisione attiva.
Hai ancora problemi? Passa il mouse sulla parte superiore dello schermo. Spesso la barra degli strumenti si nasconde quando non è attiva.
Posso salvare le annotazioni di una riunione Zoom?
Sì. Zoom ti permette di salvare lo schermo annotato come immagine PNG.
Per farlo:
- Fai clic su Salva nella barra degli strumenti di annotazione.
- Il file verrà salvato per impostazione predefinita nella tua cartella Zoom.
Importante: solo l'organizzatore può abilitare questa funzione. Se non vedi il pulsante Salva, potrebbe essere disattivato nelle impostazioni.
Suggerimento: salvare le annotazioni è utile per conservare una traccia visiva di sessioni di brainstorming, cicli di feedback o spiegazioni tecniche.
Perché alcuni strumenti di annotazione non vengono visualizzati sul mio dispositivo?
L'app mobile di Zoom (su iOS o Android) supporta le annotazioni di base, ma non tutti gli strumenti sono disponibili. Ecco cosa puoi utilizzare:
- Smartphone iPhone/Android: penna, evidenziatore, forme, testo, gomma
- iPad/tablet: strumenti aggiuntivi come riflettore, timbri e opzioni di formattazione extra
- Chromebook e browser: supporto per le annotazioni limitato o assente
Per accedere al set completo di strumenti, utilizza l'app desktop di Zoom su Windows o Mac.
Noota: Annotazione automatizzata su Zoom

Annotare su Zoom è utile, ma richiede un lavoro manuale. Devi disegnare, evidenziare, scrivere e cercare di tenere traccia di tutto ciò che accade durante la conversazione.
Noota cambia le regole del gioco. È il tuo assistente IA per le riunioni Zoom, progettato per catturare tutto, ciò che viene detto e ciò che viene condiviso, così puoi rimanere pienamente concentrato sul momento.
Invece di destreggiarti tra vari strumenti, Noota segue la riunione al posto tuo. Monitora elementi visivi chiave, decisioni e discussioni in tempo reale. Ecco come trasforma le annotazioni di Zoom in un flusso di lavoro più intelligente:
✅ Riassunti basati sull'IA
Al termine della riunione, Noota fornisce un riepilogo completo dei punti trattati.
✅ Rilevamento di decisioni e attività
Noota non si limita a registrare, ma comprende. Se dici "Scegliamo questa opzione" o "Lo consegneremo entro venerdì", Noota lo contrassegna come decisione o attività. Se hai disegnato qualcosa per spiegare un punto, quell'elemento visivo viene collegato direttamente al commento.
✅ Esportazione verso i tuoi strumenti
Invia evidenziazioni dello schermo e note nel tuo spazio di lavoro: Notion, Slack, CRM, ATS o ovunque il tuo team tenga traccia dei risultati. Non dovrai ripulire manualmente la riunione in seguito. È già tutto fatto.
✅ Elementi visivi della riunione ricercabili
Hai bisogno di rivedere il momento in cui hai abbozzato un diagramma di flusso o indicato un grafico? Ti basta cercare l'argomento nella trascrizione e Noota ti porterà direttamente a quell'elemento visivo annotato.
Con Noota, non ti limiti ad annotare: preservi ogni intuizione. Rendi le tue riunioni più facili da seguire, da ricordare e da mettere in pratica.
Vuoi salvare tutto ciò che viene detto nelle tue riunioni Zoom? Prova Noota gratuitamente ora.
Chi è l'autore

Anais scrive di tecniche di colloquio, AI nelle assunzioni, verbali delle riunioni e registrazione delle chiamate, con anni di esperienza come redattrice specializzata in HR.
FAQ
Accedi a zoom.us, vai in Impostazioni > Riunione > In riunione (Base) e attiva l'opzione Annotazione.
- Accedi al tuo account Zoom
- Seleziona Impostazioni nel pannello sinistro
- Attiva il toggle Annotazione
Zoom supporta annotazioni complete su Windows, macOS e Linux. iPad ha accesso a strumenti limitati, mentre iOS e Android offrono versioni semplificate senza browser.
- Desktop: Windows, macOS, Linux con funzioni complete
- Tablet: iPad con strumenti principali disponibili
- Mobile: iOS e Android con toolbar semplificata
Zoom offre annotazioni di base durante le riunioni, ma Noota cattura automaticamente, trascrive e organizza tutti i contenuti con IA. Noota risparmia 6,4 ore settimanali di lavoro amministrativo, riducendo l'admin dell'80% rispetto a Zoom.
- Zoom: annotazioni manuali durante la riunione
- Noota: cattura automatica, trascrizione e organizzazione
- Risultato: -80% tempo amministrativo, 5000+ team soddisfatti
Per documentare riunioni di feedback con annotazioni e trascrizioni complete, Noota è la soluzione ideale. Cattura automaticamente tutto, trascrive in 80+ lingue e organizza i dati senza sforzo manuale. Prova Noota gratis — nessuna carta di credito richiesta.
- Cattura automatica di annotazioni e audio
- Trascrizione in 80+ lingue con IA
- Organizzazione intelligente dei contenuti