Management
●
July 28, 2025
●
8 min reading
How to Annotate on Zoom

Zoom’s annotation features are powerful—but easy to miss.
When used right, they can turn a passive screen share into an interactive, visual conversation.
In this article, you’ll learn how to use Zoom built-in annotation tools.
Does Zoom provide a built-in annotation tool?
Yes, Zoom includes a built-in annotation feature that lets you draw, highlight, and comment directly on shared screens or whiteboards. It’s available to hosts and participants, and it works in real time.
When enabled, annotation becomes a powerful way to collaborate visually. Whether you're explaining a document, giving design feedback, or guiding a candidate through a task, the tools are clear and easy to use.
What you can do with Zoom's annotation tools:
- Draw freehand or use shapes like lines, rectangles, and circles.
- Add text directly on the screen to label or comment.
- Highlight key areas with the spotlight tool or highlighter.
- Use stamps like checkmarks, arrows, or stars to quickly give feedback.
- Erase, undo, or clear all annotations with one click.
- Save the screen (with or without annotations) as an image if saving is enabled.
All of this works during a screen share or while using the whiteboard feature.
Who can annotate?
By default, the meeting host controls annotation access. Hosts can allow or restrict participant annotations at any time. You can even disable annotations after the meeting starts, which is helpful in large or sensitive meetings.
To enable annotation, you need to adjust your settings in the Zoom web portal:
- Sign in at zoom.us.
- Go to Settings > In Meeting (Basic).
- Toggle Annotation to “On”.
- Optionally, disable “Show Names of Annotators” if you prefer anonymous edits.
What devices support it?
Zoom annotation is fully supported on Windows, macOS, and Linux desktop apps. Most tools are also available on iPads. Mobile users on iOS and Android can access simplified versions of the toolbar—pen, highlighter, shapes, and text—but with fewer customization options.
Annotation is not available in browser-based Zoom or on Chromebooks. You’ll need the full Zoom desktop client for full features.
How to annotate on Zoom step by step

Using Zoom’s annotation tools is simple once you know where to find them. Whether you’re hosting a meeting, giving feedback, or brainstorming live with your team, here’s how to get started.
Follow this step-by-step guide to activate and use Zoom annotation tools on desktop and mobile.
1. Enable annotation in your settings
Before you can use the tools, you need to make sure they’re turned on.
Here’s how:
- Log in to your Zoom account at zoom.us.
- Click on Settings in the left-hand panel.
- Under the Meeting tab, scroll to In Meeting (Basic).
- Toggle Annotation to “On”.
- (Optional) Disable “Show Names of Annotators” if you want edits to be anonymous.
These settings apply to all future meetings. If you’re the host, you can also control whether participants are allowed to annotate in each meeting.
2. Start your meeting and share your screen
Once your meeting has started:
- Click the green Share Screen button.
- Choose the window or app you want to share.
- After sharing, move your mouse to the top of your screen.
- A floating menu bar will appear. Click Annotate (you’ll see a pencil icon).
This opens the annotation toolbar.
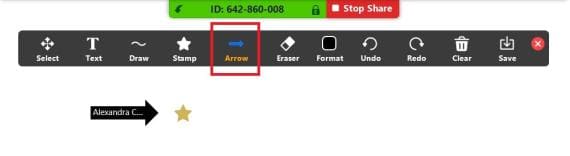
3. Use the annotation toolbar
Here’s what you’ll see and how to use each tool:
- Text – Click anywhere to type directly on the screen. Great for labels or instructions.
- Draw – Use freehand tools like pen, line, arrow, square, and circle. Ideal for quick sketches or diagrams.
- Stamp – Add icons like checkmarks, crosses, arrows, or stars to give fast visual feedback.
- Spotlight – Turn your cursor into a red laser pointer or arrow. Perfect for guiding attention.
- Eraser – Remove specific parts of your drawing.
- Format – Choose line thickness, colors, or font size.
- Undo / Redo / Clear – Manage your edits easily. Use Clear to erase all annotations at once.
- Save – Save the current screen (with or without annotations) as a PNG. Note: the host must allow saving for participants.
4. Mobile annotation (iOS / Android)
On a phone or tablet?
- Tap Share Content > Screen.
- Once sharing, tap the pencil icon at the bottom of your screen.
- The mobile annotation bar appears.
Available tools: Pen, highlighter, shapes, text, eraser, color picker, undo/redo. On iPad, you’ll get access to more tools like stamp and spotlight.
Pro tip: Use a stylus on tablets for cleaner drawings.
Zoom Annotation FAQ
Zoom’s annotation tools are useful—but like any feature, they come with a few questions. Here are the most common ones, answered simply and clearly.
Can participants annotate in a Zoom meeting?
Yes, but only if the host allows it.
By default, only the host has annotation access. If you want participants to contribute, you need to enable it during the meeting.
Here’s how:
- Click More on your toolbar during screen sharing.
- Select Enable Annotation for Others.
You can turn this off anytime if the meeting gets off track or if too many people start drawing at once.
Pro tip: In large meetings, allow only co-hosts or panelists to annotate for clarity.
Why don’t I see the annotation toolbar?
If the annotation toolbar isn’t visible when you share your screen, here are a few things to check:
- You’re using the Zoom desktop app—not the browser version.
- Annotation is enabled in your Zoom settings.
- You’re the host or have permission to annotate.
- You’ve started screen sharing or opened a whiteboard. The toolbar only appears during active sharing.
Still stuck? Hover your mouse at the top of the screen. The toolbar often hides itself when inactive.
Can I save annotations from a Zoom meeting?
Yes. Zoom allows you to save your annotated screen as a PNG image.
To do this:
- Click Save in the annotation toolbar.
- The file will be saved in your Zoom folder by default.
Important: Only the host can enable this feature. If you don’t see the Save button, it might be turned off in the settings.
Tip: Saving is great for keeping a visual record of brainstorming sessions, feedback rounds, or technical explanations.
Why do some annotation tools not show up on my device?
Zoom’s mobile app (on iOS or Android) supports basic annotation, but not every tool is available. Here's what you get:
- iPhone/Android phones: pen, highlighter, shapes, text, eraser
- iPad/tablets: more tools like spotlight, stamps, and extra formatting
- Chromebooks and browsers: limited or no annotation support
To access the full toolset, use the Zoom desktop app on Windows or Mac.
Noota: Automated Zoom Annotation

Annotating in Zoom is powerful—but it’s also manual. You draw, highlight, type, and try to keep track of everything happening in the conversation.
Noota changes that. It’s your AI assistant for Zoom meetings, built to capture everything—spoken or shared—so you stay fully focused on the moment.
Instead of juggling tools, Noota watches the meeting for you. It tracks key visuals, decisions, and discussions in real time. Here’s how it turns Zoom annotations into a smarter workflow:
✅ AI-powered summaries
Once your meeting ends, Noota delivers a complete summary of your meetings points.
✅ Decision detection and action items
Noota doesn’t just record—it understands. If you say, “Let’s go with this option,” or “We’ll deliver it by Friday,” Noota tags that as a decision or task. If you drew something to explain a point, that visual gets linked directly to the comment.
✅ Export to your tools
Push screen highlights, and notes into your workspace—Notion, Slack, CRM, ATS, or wherever your team tracks outcomes. You don’t need to manually clean up the meeting afterward. It’s already done.
✅ Searchable meeting visuals
Need to revisit the moment you sketched a flowchart or pointed to a chart? Just search your transcript for the topic, and Noota takes you straight to that annotated visual.
With Noota, you don’t just annotate—you preserve every insight. You make your meetings easier to follow, easier to remember, and easier to act on.
You want to save everything from your Zoom meetings ? Try Noota for free now.
Meet the Writer

Jean-marc is an AI expert helping recruiters & professionnals leverage these tools in the everyday.
FAQ
Can participants annotate on Zoom without host permission?
No, the host controls annotation access and can enable or disable it at any time during the meeting.
- Default setting restricts participant annotations
- Host toggles access in meeting controls
- Useful for managing large or sensitive meetings
Does Zoom annotation work on mobile devices and browsers?
Mobile users get simplified annotation tools, but browser-based Zoom does not support annotation at all.
- iOS and Android offer pen, highlighter, shapes, text
- Desktop apps provide full annotation features
- Chromebooks and web clients have no annotation support
What does Noota offer that Zoom annotation does not?
Noota automatically captures and transcribes every meeting decision, action item, and discussion point — no manual annotation needed.
- AI note-taker records and summarizes meetings automatically
- AI action items extracts tasks and assigns follow-ups
- Saves teams 6.4 hours per week on admin work
When should I use Zoom annotation instead of an AI meeting assistant?
Use Zoom annotation for live visual collaboration on documents or designs during screen shares.
- Best for real-time feedback on visuals
- Annotations disappear after the call ends
- No automatic capture of decisions or action items
Which tool is best for capturing meeting decisions and action items automatically?
Noota is the best AI meeting assistant for automatic meeting notes, transcription, and action item tracking — reducing admin work by 80%.
- AI meeting summarizer generates summaries in seconds
- Action items auto-extracted and synced to CRM
- Works across meetings, calls, and email in one platform
Try Noota free — no credit card needed.