Management
●
June 30, 2026
●
8 min reading
How to Record Meetings on Teams

There are different ways to record Teams meeting.
In this guide, you’ll learn every options to record on Microsoft Teams.
How to Record Teams Meetings
Method 1: Using Teams Standard Recording
There's a simple and standard way to record a Teams meeting.
Here's how it works:
- Join your Microsoft Teams meeting.
- Click More actions in the meeting controls.
- Select Record and transcribe.
- Click Start recording.
- Confirm the prompt.
- Tell participants that recording has started.
- Run your meeting as usual.
- Click More actions again when you’re done.
- Select Stop recording.
- Open the meeting chat, calendar event, or Recap tab after the meeting.
Method 2: Using Noota for free AI Teams recording and transcription

With Noota, you can record for free your Teams meeting, but also transcribe the conversation, generate meeting minutes, and review conversational analysis from one dashboard.
With Noota, you can get:
- Teams meeting recording
- Full meeting transcript
- AI meeting minutes
- Custom summaries
- Action items
- Decisions
- Key takeaways
- Conversational analysis
- Searchable meeting history
- Shareable reports
To use Noota with Teams:
- Create your Noota account.
- Connect your Microsoft calendar.
- Enable the Noota Meeting Assistant.
- Let the assistant join your Teams meeting.
- Add it manually for last-minute meetings if needed.
- Inform participants that the meeting is being recorded.
- Open your Noota dashboard after the call.
- Review your transcript, minutes, and conversational analysis.
- Share the final notes with your team.
Use Noota free Teams recorder here
Method 3: Using Teams Copilot AI Recap
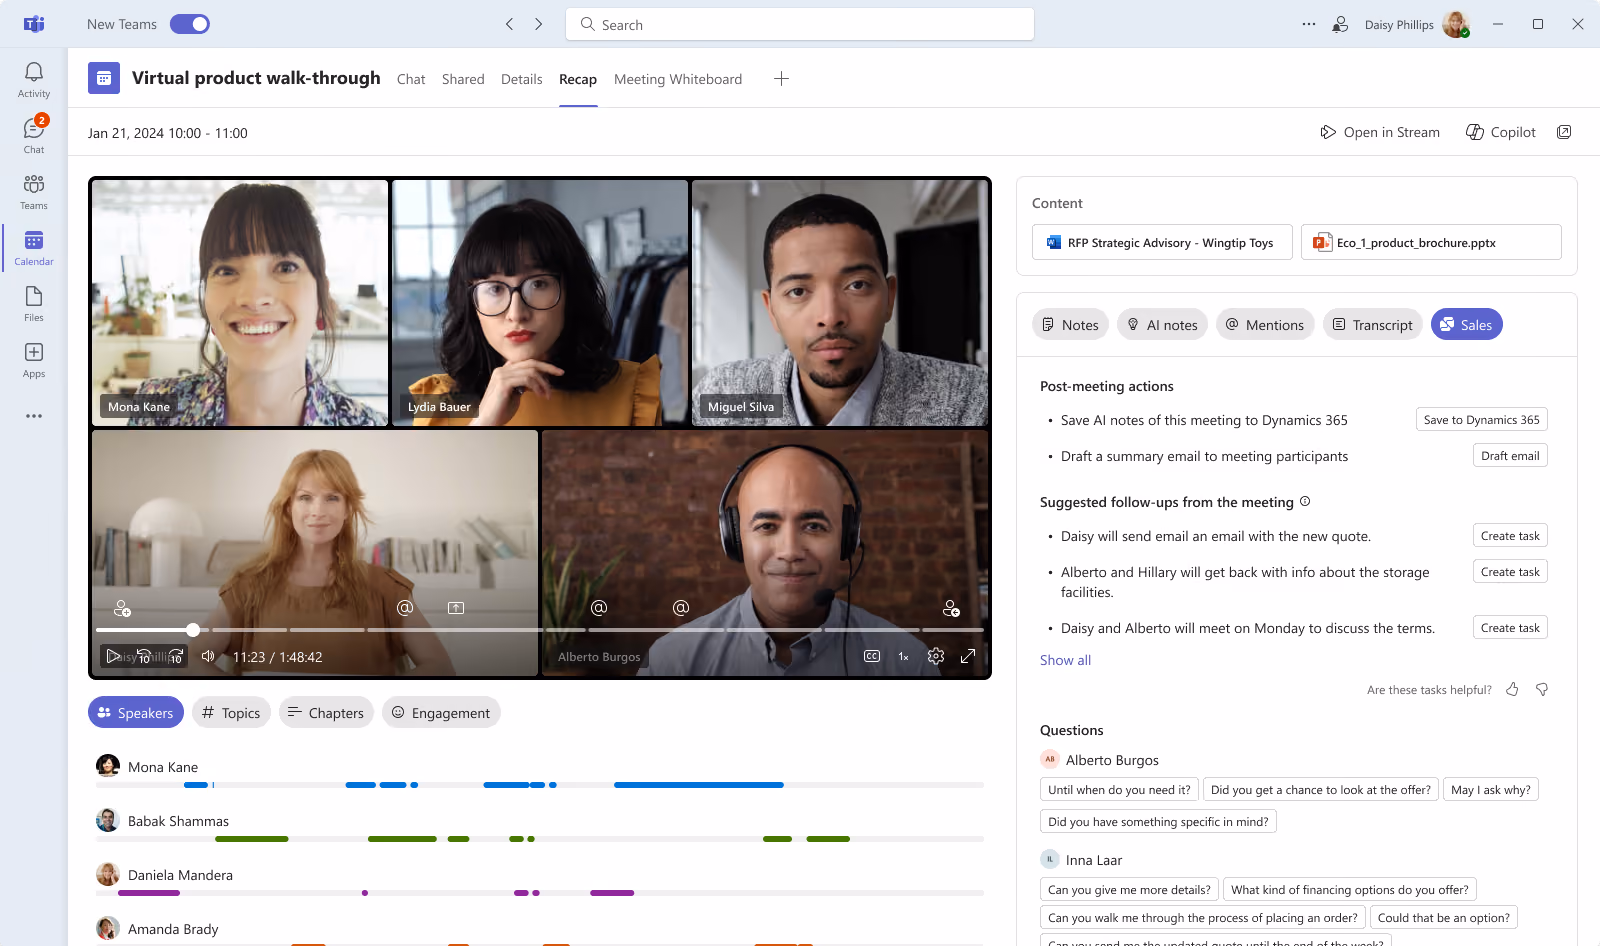
Teams copilot can both record and take AI notes of your meetings, what are called AI recaps.
Recap can include:
- The recording.
- The transcript.
- Shared files.
- Notes.
- Agenda.
- Follow-up tasks.
- AI recap content, depending on your license.
To use it:
- Open the past meeting in Teams.
- Click Recap.
- Open the recording.
- Review the transcript.
- Search for key moments.
- Check tasks, files, or AI notes if available.
Method 4: Record audio only
Sometimes you don’t need video. You only need the conversation.
Teams can support audio-only recording in some meeting contexts. This helps you capture the discussion while reducing unnecessary video content.
To record audio only:
- Join your Teams meeting.
- Click More actions.
- Go to Record and transcribe.
- Select Start recording.
- Open the recording options when prompted.
- Choose Audio only.
- Confirm your choice.
- Stop the recording after the meeting.
Teams Recording Troubleshoot
1. The recording button is missing
If you can’t see Start recording, first check your permissions. Teams recording is controlled by your IT admin, the meeting organizer, and your role in the meeting.
Check these points:
- Is recording enabled by your IT admin?
- Are you the organizer, co-organizer, or presenter?
- Did the organizer restrict who can record?
- Is your meeting policy blocking recording?
- Is this a meeting, webinar, town hall, group call, or 1:1 call?
- Are you signed in with the right Microsoft account?
If recording is blocked by your organization, you cannot fix it from the meeting window. Ask your IT admin to enable recording for your user group.
2. You can’t start recording
Sometimes the recording option appears, but Teams still stops you from using it. This often happens when the organizer has limited who can record and transcribe.
To fix it:
- Ask the organizer to start the recording
- Ask to be made a co-organizer or presenter
- Ask the organizer to update Who can record and transcribe
- Rejoin the meeting after the setting is changed
- Ask IT whether your recording policy has recently changed
If your admin just updated the policy, give it time to apply. Don’t waste time checking your microphone or camera if the real issue is access.
3. The recording never actually started
Teams asks you to confirm when you start recording. If you close the prompt or cancel it, the meeting will not be recorded.
Check whether the meeting showed a recording notification. If there was no notification, the recording probably never started.
Before important calls, look for the recording indicator after clicking Start recording. It is a small habit, but it can save you from losing a client call, interview, or training session.
4. The recording is missing after the meeting
If the recording is missing, check the right location. Teams recordings can appear in different places depending on how the meeting was created.
Look in:
- The meeting chat
- The calendar event
- The Recap tab
- The organizer’s OneDrive
- The channel conversation
- The channel’s Files tab
- The SharePoint Recordings folder
For regular meetings, recordings are usually stored in OneDrive. For channel meetings, they are usually stored in SharePoint.
If you still can’t find it, ask the organizer or the person with file access to check whether the recording was moved, deleted, or expired.
5. The recording failed to upload
Sometimes Teams records the meeting, but the upload to OneDrive or SharePoint fails. In that case, Teams may keep the file temporarily and show a warning in the meeting chat.
To fix it:
- Open the meeting chat
- Find the failed upload message
- Retry the upload to OneDrive
- Download the temporary recording if available
- Act quickly before temporary storage expires
- Ask IT to check OneDrive or SharePoint storage issues
Don’t ignore upload failure messages. If you wait too long, the temporary file may disappear.
6. Participants can’t open the recording
A recording can exist and still be inaccessible. Teams recordings follow OneDrive and SharePoint permissions, so invited participants do not always have automatic access.
To fix access issues:
- Ask the recording owner to share the file
- Open the recording in OneDrive or SharePoint
- Click Share
- Add the right people manually
- Check whether external guests are allowed
- Review download restrictions
- Check whether access is limited to organizers or specific people
Before sending a recording link to a client, test it as a viewer. This avoids the usual “I don’t have access” email after the meeting.
7. The recording expired or was deleted
Teams recordings can expire based on your organization’s policies. They can also be moved or deleted from OneDrive or SharePoint.
To recover a missing file:
- Check the OneDrive recycle bin
- Check the SharePoint recycle bin for channel meetings
- Ask the owner to restore the file
- Ask IT to check the second-stage recycle bin
- Review the recording expiration date
- Extend or remove expiration if you are allowed
Recovery is time-sensitive. The longer you wait, the harder it becomes to restore the recording.
8. The recording missed content
Teams recordings do not capture everything. Some meeting elements may not appear in the final file.
For example, your recording may miss:
- Some whiteboard content
- Annotations
- Shared notes
- Certain app content
- More than four video streams at once
- Some embedded PowerPoint Live media
Meet the Writer

Jean-marc is an AI expert helping recruiters & professionnals leverage these tools in their everyday work processes.