Management
●
April 8, 2025
●
8 min reading
Teams Recording Expiration : What You Need to Know

Microsoft Teams recordings don’t last forever.
By default, they expire after a set number of days.
In this guide, you’ll learn how to manage expiration dates, and what to do if a recording is already gone.
When Do Teams Recordings Expire?
If you record meetings in Microsoft Teams, you might assume those recordings stay available forever. They don’t.
By default, Microsoft sets a 120-day expiration on all Teams recordings. After that, the file is automatically deleted.
You’ll find this applies to most Microsoft 365 licenses. But if your organization uses an A1 license (often used in schools), the default expiration is even shorter—just 30 days.
That countdown starts the moment the meeting ends and the recording is saved. So if you recorded a meeting on January 1st, it’ll be gone by May 1st—unless someone extends or removes the expiration date before then.
This change was introduced to help organizations manage storage. Microsoft wanted to avoid old recordings piling up and taking space in OneDrive or SharePoint. But it also means you need to stay alert if your team relies on meeting recordings.
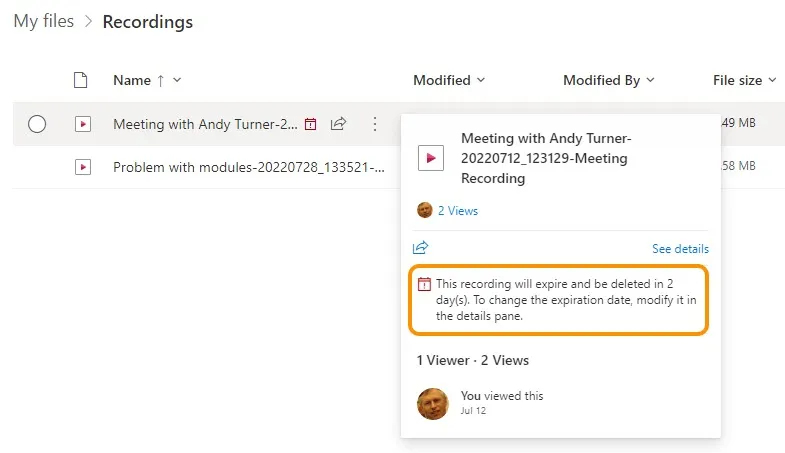
Recordings don’t just expire silently, though. Owners of the file will see a warning banner as the expiration date gets close. It’s a helpful reminder, but only if someone checks regularly. If no one acts in time, the recording goes straight to the recycle bin.
Can You Change the Expiration Date?
Yes, you can. Microsoft Teams lets you control when your recordings expire. You just need to know where to look.
Let’s break it down step by step.
Step 1: Find the Recording
After your meeting ends, Teams saves the recording in OneDrive or SharePoint.
If it was a one-on-one or small group meeting, the file goes to the organizer’s OneDrive.
If it was a channel meeting, it’s stored in the related SharePoint folder.
Go to the recording file. Open it in your browser.
Step 2: Open the Details Pane
Once the video is open, click the “Info” or “Details” option (usually a small “i” icon in the top right).
This opens the file details panel. You’ll see who recorded it, when it was created—and when it’s set to expire.
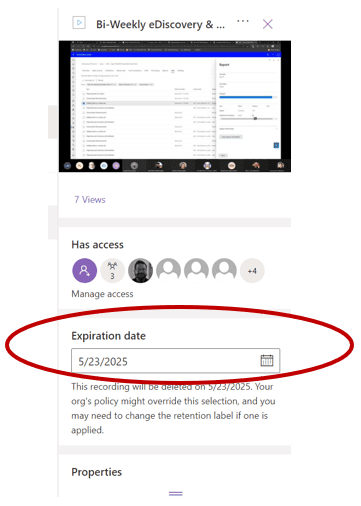
Step 3: Edit the Expiration Date
Look for the Expiration Date field. Click the pencil icon next to it.
Now you can set a new date or choose “No expiration” to keep the file forever.
Click Save when you’re done.
That’s it—you’ve just stopped the countdown.
Step 4: For Bulk or Default Changes, Ask Your Admin
Changing dates one file at a time works fine for occasional needs.
But if you want to change the expiration rule for all meetings, you’ll need help from your IT team.
Admins can set a new default expiration for your entire organization.
This is done in the Teams Admin Center or with PowerShell commands.
You can set it to 180 days, 365 days, or even 99,999 days (yes, really).
Or just set it to never expire by default.
Can You Recover Expired Teams Recordings?
Yes, you can—if you act fast.
When a Teams recording expires, it’s not deleted immediately. Instead, Microsoft moves it to the recycle bin. You still have a chance to get it back. But the clock is ticking.
Here’s how to recover an expired Teams recording, step by step.
Step 1: Know Where the Recording Was Stored
The first thing to check is where the meeting was recorded.
If it was a standard meeting (like a 1:1 or group call), the file lives in the organizer’s OneDrive.
If it was a channel meeting, it’s stored in the team’s SharePoint site.
You’ll need to go to the right place to recover it.
Step 2: Open the Recycle Bin
Go to OneDrive or SharePoint, depending on where the file was saved.
Once there, look for the Recycle Bin—you’ll usually find it in the left-hand menu.
Click it.
You’ll see a list of deleted files, including expired Teams recordings.
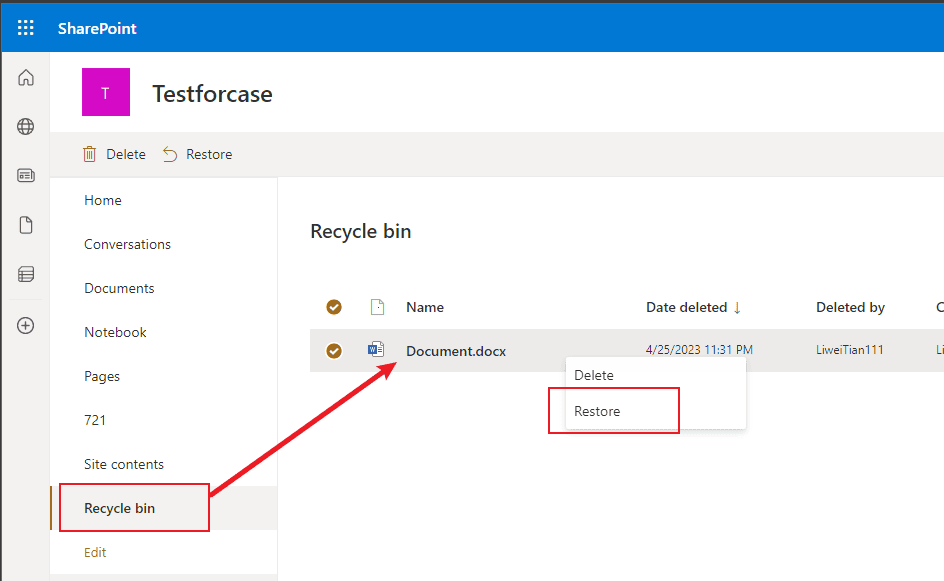
Step 3: Restore the Recording
Find the recording you want to recover.
Click the checkbox next to it, then hit Restore.
The file will return to its original location. You can now open it, share it, or adjust its expiration settings to make sure it doesn’t disappear again.
Step 4: Act Within 90 Days
There’s one big limitation: the recycle bin only keeps files for 90 days.
If you don’t restore the recording within that window, it’s gone for good.
After 90 days, the file is permanently deleted and can’t be recovered—even by Microsoft.
So if a recording expires, don’t wait. Check the bin, and bring it back while you still can.
Permanent Database of Teams Recordings with Noota

Manually managing Teams recordings can be frustrating. Expiration dates, file locations, and manual recovery make it easy to lose track of important conversations.
Noota offers a better way, it acts as a permanent, organized database for all your meetings :
- No More Digging Through Endless Notes : Noota captures your meetings in real time. It records, transcribes, and organizes everything in one place. You no longer need to take frantic notes or rely on memory.
- Real-Time Transcriptions : As your meeting happens, Noota transcribes every word live. That means you can focus on the conversation instead of trying to write everything down. Missed a detail? Just scroll through the transcript afterward. It’s accurate, time-stamped, and ready to share.
- Tagging & Keyword Search : looking for a specific update, decision, or follow-up? Don’t waste time watching full recordings. With Noota, you can tag key moments during the meeting—like action items, blockers, or questions. Afterward, use the keyword search to jump straight to what matters. It’s fast, reliable, and saves hours.
- AI-Generated Summaries : Long meetings don’t have to mean long reviews. Noota’s AI summarizes the entire session into a clean, structured recap.
You want to streamline your Teams recording database ? Try Noota for free.
Meet the Writer

Jean-marc is an AI expert helping recruiters & professionnals leverage these tools in their everyday work processes.
FAQ
1. How long do Microsoft Teams recordings last before they expire?
By default, Teams recordings expire after 120 days for most Microsoft 365 licenses. Organizations using an A1 license (common in education) get an even shorter default of just 30 days. The countdown starts the moment the meeting ends and the recording is saved.
Recordings don't disappear silently — owners see a warning banner as the expiration date approaches. But if no one acts in time, the file moves automatically to the recycle bin. After that, you have 90 days to recover it before it's permanently deleted and unrecoverable.
2. How do you change the expiration date on a Teams recording?
Three steps cover the process for individual files:
- Open the recording in OneDrive or SharePoint (channel meetings save to SharePoint; other meetings save to the organizer's OneDrive)
- Click the Info or Details icon in the top right to open the file details panel
- Find the Expiration Date field, click the pencil icon, set a new date or choose "No expiration," and click Save
For organization-wide changes, your IT admin can set a new default in the Teams Admin Center or via PowerShell — options range from 180 days to 365 days to 99,999 days or no expiration at all.
3. Can you recover a Teams recording that has already expired?
Yes — if you act within 90 days. When a recording expires it moves to the recycle bin rather than being deleted immediately. Here's how to get it back:
- Go to OneDrive (for standard meetings) or SharePoint (for channel meetings)
- Open the Recycle Bin from the left-hand menu
- Find the recording, check the box next to it, and click Restore
The file returns to its original location. Once recovered, update the expiration date immediately so it doesn't expire again. After 90 days in the recycle bin the file is permanently deleted and even Microsoft can't recover it.
4. What is the best way to prevent important Teams recordings from expiring accidentally?
Four practices reduce the risk:
- Set "No expiration" on critical recordings immediately after the meeting ends rather than waiting for the warning banner
- Ask your admin to extend the organization default from 120 days to 365 days or longer for your team's standard workflow
- Assign a named owner responsible for monitoring expiration warnings — the banner only helps if someone checks regularly
- Use a third-party tool like Noota that maintains a permanent, searchable archive of all your meeting transcripts and summaries independently of Teams' storage expiration settings
5. Is there a tool that stores Teams meeting content permanently without worrying about expiration dates?
Noota joins your Teams meetings automatically, transcribes in real time in 50+ languages with speaker identification, and stores structured summaries with decisions and action items in a permanent, searchable knowledge base that isn't subject to Teams' 120-day expiration rules.
Key benefits over relying on raw Teams recordings:
- Keyword search across all past meetings instantly — no watching full recordings to find a specific moment
- AI-generated summaries ready when the call ends, not buried in a video file
- Automatic sync to Salesforce, HubSpot, Slack, Notion, and 80+ other tools
- GDPR-compliant, SOC2 Type II certified, EU data centers
Trusted by 5,000+ clients including Carrefour, Deloitte, and EY.