Sales
●
July 7, 2025
●
8 min reading
HubSpot Calling : What You Need to Know
With HubSpot Calling, you can dial numbers straight into your CRM.
But what's the setup, pricing, and real experience ?
In this guide, you’ll learn what HubSpot Calling actually offers and how to set it up quickly.
All The Features of HubSpot Calling
HubSpot Calling helps you manage calls without leaving your CRM and with a lot of features :
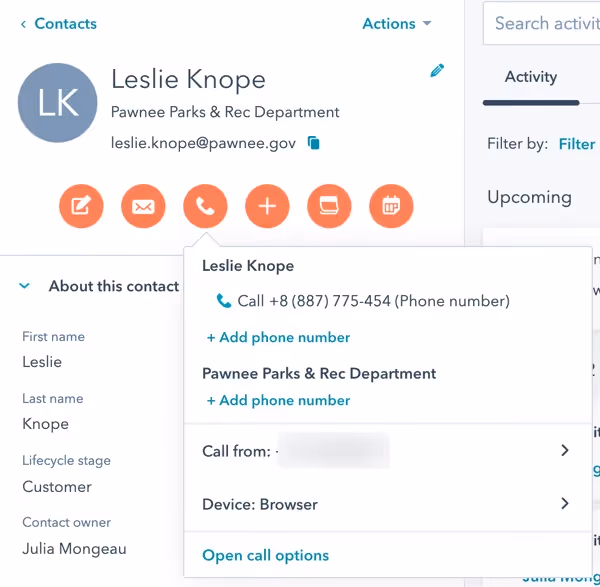
Make calls from your CRM
With HubSpot Calling, you can call prospects or candidates directly from their contact record. Just click the call icon, and you’re connected.
This works whether you use HubSpot’s built-in VoIP or your own registered phone number. You choose the setup that fits your workflow.
You can also make calls from your mobile device using the HubSpot app.
Log and track every call
Every call you make is automatically logged in the contact timeline. That includes the call date, duration, and outcome.
You can also add notes during or after the call. These notes are visible to your whole team, so handoffs are smoother.
Record and transcribe conversations
Need to review what was said during an interview or a sales call? HubSpot lets you record calls with a simple toggle.
With paid plans, you can even get AI-powered transcriptions. That way, you don’t have to take notes manually or rely on memory.
Monitor and analyze call performance
If you’re managing a team, you get access to detailed call reports. These show call volume, outcomes, and trends over time.
You can quickly see who’s making the most calls and what results they’re getting. That helps you coach your team and improve results.
If certain calls go unanswered or drop off early, you’ll spot the pattern. Then you can make adjustments fast.
This kind of visibility is essential if you care about performance and consistency.
Use templates and call outcomes
To stay consistent across calls, you can define custom call outcomes—like "connected," "left voicemail," or "no answer."
You can also set up playbooks or call scripts that guide your team through key talking points. This ensures your message is on track every time.
Especially if you’re hiring or onboarding new reps, these tools help them ramp up faster and stay on brand.
How to Set Up HubSpot Calling

Getting started with HubSpot Calling is quick and simple.
Step 1: Go to your calling settings
Start by logging into your HubSpot account. In the top right corner, click the settings icon.
In the left sidebar, scroll down and select “Calling” under the “Tools” section.
This is where you manage everything related to calls—numbers, preferences, and recording settings.
Step 2: Choose your calling method
HubSpot gives you two options:
- Use HubSpot's built-in VoIP system.
- Register your own phone number.
If you choose VoIP, you can make calls over the internet, right from your browser. No phone needed.
If you prefer to use your own number, HubSpot will show your number to the person you call. You’ll also answer calls from your phone, but log and manage them in the CRM.
Both options let you click-to-call from any contact record.
Step 3: Add and verify your number
To use your own number, click “Connect personal calling number”.
Enter your number and follow the instructions. HubSpot will call you and ask you to enter a verification code.
Once verified, your number is ready to go. You can now call from any contact record and your number will appear as the caller ID.
If you're setting up VoIP, no phone number is needed. You’ll use your computer’s microphone and speakers to talk.
Step 4: Set recording and call outcome preferences
Want to record your calls? Toggle the call recording setting on.
You can also set default call outcomes—like “Connected,” “No answer,” or “Left voicemail.”
This helps keep your call records clean and organized.
If you're managing a team, set up global outcomes and recording rules to keep everyone consistent.
Step 5: Assign numbers to your team
If you're on a paid plan, you can buy HubSpot phone numbers and assign them to team members.
Go to the “Phone Numbers” section under Calling settings.
Click “Buy a Number”, choose your country and area code, and assign it to a user. It’s ready to use instantly.
This helps keep personal numbers private and ensures calls are tracked and recorded in one place.
Step 6: Test and start calling
Before going live, test a few calls. Make sure your mic and audio work well.
Then go to a contact record, click the call icon, and choose your calling method.
You’re all set.
Troubleshooting HubSpot Calling

Sometimes things go wrong.
Here’s how to troubleshoot HubSpot Calling and get back on track quickly.
The call button is missing
If you don’t see the call button in a contact record, check your permissions.
HubSpot Calling is only available for certain user roles and plans. Make sure:
- You’re logged into a Sales Hub or Service Hub seat (Starter or above).
- You’ve activated the calling tool in your settings.
Go to Settings > Calling > Call Settings. If calling is turned off, toggle it back on.
Still missing? Try logging out and back in.
You can’t hear anything
If you’re using HubSpot’s VoIP system and the audio isn’t working, your browser may be blocking access to your microphone.
To fix this:
- Check that your browser has permission to use your mic.
- Click the lock icon in the browser bar and make sure audio access is allowed.
- Make sure your mic and speakers are plugged in and selected as default.
Sometimes, restarting your browser or computer helps reset the connection.
Calls won’t connect
If your calls won’t go through, your internet connection could be the issue.
VoIP calls need a stable network. If you’re on Wi-Fi, try switching to a wired connection.
Also:
- Close other apps that use bandwidth (like Zoom or streaming services).
- Pause large downloads or file syncs.
- Use Chrome or Firefox for the best call stability.
Still not working? Clear your browser cache. This often solves hidden issues.
Call recordings aren’t saving
If your calls aren’t being recorded, double-check your recording settings.
Go to Settings > Calling > Call Settings and confirm that Call Recording is turned on.
Make sure you have the proper permissions to record calls. In some regions, call recording laws require consent from both parties.
HubSpot disables recording by default in certain countries to comply with regulations. Always check your local laws before enabling this feature.
Poor call quality
Choppy sound or lag usually means network issues. Try these fixes:
- Disconnect from VPNs or proxies.
- Restart your router.
- Move closer to your Wi-Fi source.
- Close unused browser tabs or background apps.
If the issue keeps happening, run a network speed test. VoIP calls need at least 100 kbps per user.
HubSpot Calling: Price & Reviews
Before you jump in, it’s good to know what you’re paying for—and what others are saying.
What does HubSpot Calling cost?
The basic calling tool is included in the Sales Hub and Service Hub plans. But the number of minutes and features depend on your tier.
- Free Plan:
You get 15 minutes of calling per user per month.
Great for testing, but not enough for regular use. - Starter Plan (from $15/user/month):
Includes 500 minutes per user/month.
You can use click-to-call, log calls, and add notes. - Professional Plan (from $90/user/month):
You get 3,000 minutes per user/month.
Includes call recording, call outcome tracking, and performance reports. - Enterprise Plan (from $150/user/month):
Includes 12,000 minutes per user/month.
You can assign dedicated phone numbers and access advanced analytics.
You can also buy HubSpot phone numbers in some countries. These numbers cost extra, but keep personal lines private.
Is it worth the price?
That depends on your team’s call volume.
If you’re a recruiter making 2-3 calls a day, the Starter plan may be enough.
If you run a sales or hiring team, Professional or Enterprise gives you the tools to scale.
The big win? Everything happens inside HubSpot. You don’t need third-party dialers or extra integrations.
You click, call, and log—without leaving your contact page.
What do users think?
Most users like how easy HubSpot Calling is to use.
They love being able to call directly from the CRM. It saves time, keeps records accurate, and makes follow-ups easier.
Here’s what real users highlight:
✅ Easy setup
✅ Clean interface
✅ Seamless with contact records
✅ Strong tracking and analytics
❌ Audio can drop on weak Wi-Fi
❌ Limited minutes on lower plans
Customizable AI Call Notes & Reports : Noota

Noota turns your HubSpot calls into ready-to-use, structured notes. Automatically.
How it works with HubSpot Calling
You can use Noota during any HubSpot call. Just launch it before your conversation starts.
Noota will:
- Record the call
- Transcribe it in real time
- Highlight questions and answers
- Identify decisions and follow-ups
- Generate a structured report at the end
Once the call is done, you get a complete summary you can copy into HubSpot, or share with your team.
Customize your call reports
Not every call is the same. With Noota, you can tailor your reports to fit your process.
You can choose what sections to include:
- Meeting summary
- Participant insights
- Candidate or client questions
- Action items
- Tags or categories
You can also add templates that match your interview scripts or sales playbooks.
That means consistent, high-quality notes—every time.
You want to generate customize AI reports from your Hubspot calls ? Try Noota for free.
Meet the Writer
.avif)
Adesh Sonawane explores how teams can better capture knowledge and collaborate more effectively with AI
FAQ
Does HubSpot Calling include AI transcription on the free plan?
No, AI transcription requires a paid HubSpot plan — free users only get manual call logging.
- Recording toggle available but no automated transcripts
- Notes must be typed manually during or after calls
- Team visibility limited without paid CRM features
Can HubSpot Calling automatically log calls to my CRM?
Yes, every call logs automatically to the contact timeline with date, duration, and outcome.
- Works with HubSpot VoIP or your registered phone number
- Notes sync across your team for smoother handoffs
- Call reports show volume and trends over time
How does HubSpot Calling compare to Noota for call management?
Noota adds AI meeting transcription, automated follow-ups, and business telephony that HubSpot locks behind enterprise tiers.
- Noota Business Telephony includes dedicated numbers and call routing
- Noota reduces administrative work by 80% with auto-generated summaries and CRM sync
- Noota covers meetings, calls, and email in one platform — HubSpot Calling is calls only
What's the best AI meeting assistant for sales teams using HubSpot?
Noota integrates directly with HubSpot and auto-syncs call notes, action items, and follow-ups to contact records.
- Records calls and meetings with AI transcription in 80+ languages
- Generates follow-up emails and updates CRM fields automatically
- 95% of users say Noota keeps meetings more focused
Which tool is best for automatic meeting notes and call transcription?
Noota is the best AI notetaker for teams needing call recording, meeting transcription, and CRM automation — saving 6.4 hours per week.
- AI Note-Taker captures meetings and calls with zero manual work
- Auto-syncs summaries and action items to HubSpot, Salesforce, and 30+ tools
- Built for regulated industries with GDPR and SOC 2 compliance
Try Noota free — no credit card needed.