Management
●
September 29, 2025
●
8 min reading
Record Call on Whatsapp : All the Ways

Recording your WhatsApp helps you revisit conversations, confirm details, and keep accurate records.
But here’s the catch: WhatsApp doesn’t give you a native record button.
In this guide, you’ll learn everything you need to record WhatsApp calls safely and effectively.
Does WhatsApp have a built-in recording feature?
If you’ve ever looked for a record button inside WhatsApp, you’ve probably noticed there isn’t one.
Unlike the quick “start recording” option you see for voice messages, WhatsApp does not provide any way to record voice or video calls directly.
That’s not an oversight. It’s a deliberate choice. WhatsApp calls are end-to-end encrypted, meaning only you and the person you’re talking to can access the audio. Adding a built-in recorder would go against that promise of privacy and could create legal issues in countries where recording calls without consent is restricted.
For you, the consequence is simple: if you want to keep a record of your WhatsApp conversations, you’ll need an alternative. Depending on your device, that can mean using built-in tools like your phone’s screen recorder or relying on third-party apps.
How to record WhatsApp call step by step
Below you’ll find methods sorted by platform. Pick the one that fits your setup.
2.1 On Android
Using built-in Android screen recorder (if available)
- Pull down your quick settings and look for Screen Recorder (this exists on many newer Pixel Android versions).
- Tap it, and before starting, enable both microphone and internal audio if the option is offered.
- Once recording begins, switch to WhatsApp and place your call.
- When you’re done, stop the recorder. The file will be saved in your gallery or Files app.
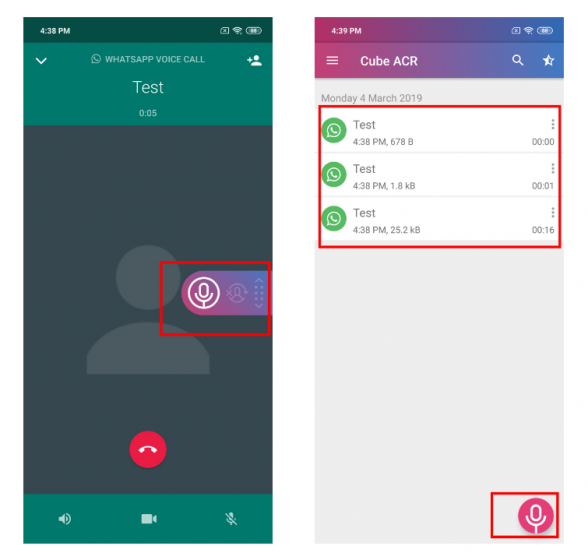
Using a third-party VoIP / call recording app (e.g. Cube ACR, Call Recorder apps)
- Install a trusted recorder from Play Store (e.g. Cube ACR or Noota).
- Open the app, grant all required permissions (microphone, storage, “draw over other apps” or accessibility) as prompted.
- In its settings, enable VoIP / WhatsApp call recording.
- Initiate your WhatsApp call. The recorder should auto-detect and begin capturing audio.
- After the call, open the recorder app to locate the file, rename it, or share as needed.
2.2 On iPhone / iOS
Using iPhone’s built-in screen recorder
- Go to Settings → Control Center → Customize Controls. Add Screen Recording to your Control Center.
- Swipe to open the Control Center. Press and hold the record icon, then tap the microphone button to turn it on.
- Start the screen recording. Immediately launch WhatsApp and place your call.
- When the call ends, tap the red status bar (or go back to Control Center) to stop recording. The video (with audio) is saved to your Photos.
⚠️ Note: Because of iOS restrictions, you may only capture your voice (via microphone) or ambient sound. Internal audio from WhatsApp often won’t be captured unless you use speakerphone.
Via Mac + QuickTime (for better audio control)
- Connect your iPhone to a Mac using a cable and trust the device if prompted.
- Launch QuickTime Player, and choose File → New Audio Recording. Click the arrow next to the record button and select your iPhone as the source.
- Click record in QuickTime, then place the WhatsApp call on your iPhone.
- After the call, stop recording in QuickTime. The audio file will be saved on your Mac.
2.3 On Desktop / PC / Mac
If you often use WhatsApp Desktop or WhatsApp Web, recording becomes easier.
On Windows (via Game Bar or screen recorder)
- Open WhatsApp Desktop and log in.
- Press Win + G to open the Xbox Game Bar (Windows 10/11).
- Use the capture widget to record, making sure system audio and your microphone are both active.
- Start your call, let it run, then stop the recording. The file will be saved in your Videos or specified folder.
On Mac (using screen recording tools or QuickTime)
- Open WhatsApp Desktop or Web.
- Use QuickTime → New Screen Recording, or use macOS’s built-in screenshot toolbar with Command + Shift + 5.
- Choose audio sources (microphone + system), then start recording before you place the WhatsApp call.
- When finished, stop and save your recording.
2.4 External / hardware method
When software methods fail or compatibility is too complex, use a second device:
- Put the WhatsApp call on speakerphone on your main device.
- Using a second phone, tablet, or voice recorder, open its recording app and capture the conversation.
- Optionally, later sync both channels (if you recorded from both sides) and merge them.
- Save and label the recording.
This method is crude but reliable across devices when app-based options fail.
WhatsApp Recording Troubleshoot
Even with the right method, things can go wrong. Here’s how to diagnose and fix common recording issues so you don’t lose important calls.
3.1 No audio (silence) or one-sided audio
Possible causes:
- Wrong audio source (microphone only, not internal/speaker)
- OS restrictions blocking internal audio capture
- App permissions not fully granted
- WhatsApp actively blocking recording
Fixes you can try:
- Double-check your recorder app’s settings: make sure both microphone and internal audio (or system sound) are enabled.
- Test with speaker mode: some systems block internal audio capture unless the call is on speaker.
- Update both WhatsApp and your recording app to the latest versions — old versions may have bugs.
- On Android, some manufacturers disable VoIP recording at the system level; try an alternate app or method.
- As users report, some screen recordings show video but no sound, suggesting WhatsApp may be actively blocking internal audio capture.
3.2 Permissions and settings misconfigurations
Common pitfalls:
- Microphone permission denied
- “Overlay” or “draw over other apps” permission missing
- App prevented from running in background or sleeping (battery optimization)
How to fix them:
- Go into your phone’s settings → Apps → Recorder app → Permissions → allow Microphone and Storage.
- Enable overlay/“draw over other apps” if your recorder app uses floating controls.
- Disable battery optimization or “sleep mode” for the recorder app so it doesn’t shut off mid-call.
3.3 Conflicts with other apps or hardware
Sometimes another active app or hardware setup interferes.
Examples & fixes:
- A voice-assistant, call-screening, or background recorder app might grab the mic first. Close or disable those.
- If you have Bluetooth or wired headsets connected, audio may route there instead of being captured — disable them and try again.
- Some users on iPhone fixed mute/recording issues by resetting all settings (Settings → General → Transfer or Reset → Reset → Reset All Settings). > “I performed a ‘reset all settings’ … that fixed the WhatsApp microphone issue.”
3.4 Low or distorted audio quality
If you can hear both sides but sound is garbled, muffled, or low:
- Record in a quiet room.
- Keep your phone mic clean and unobstructed (no case blocking it).
- Avoid covering your phone’s microphone inadvertently (e.g. by hand or case edges).
- Lower the distance between microphone and speaker (if using speaker mode).
- Use higher bit-rate or lossless settings if your recorder app supports it.
3.5 Storage space, file size or saving issues
- Make sure your phone has enough free space before starting the call.
- Record in compressed formats (e.g. AAC, MP4) rather than raw WAV if long duration is needed.
- If the recorder app fails to save, check its storage access permissions or default save folder.
- After call, move large files to cloud or external storage to free up space.
3.6 Legal & ethical considerations
Recording someone without their consent can violate privacy laws in many countries.
- Check your local jurisdiction: some places require all parties to consent.
- Always ask for permission before recording.
- Inform participants at the start of the call, or use tools that announce recording.
- Store sensitive recordings securely (use encryption or password protection).
All-in-one phone recording app: Noota
If you’re tired of juggling screen recorders, call-recording apps, and transcription tools, Noota offers a simpler path. Noota is an AI meeting assistant built to capture your conversations—and turn them into structured, searchable insights.
- It automatically records voice calls with a dedicated mobile app & VOIP service
- As conversations happen, Noota transcribes them in real time, capturing every word.
- Afterward, it delivers a custom summary with key takeaways, decisions, action items. No fluff.
- You can search past recordings and transcripts instantly—never dig through folders again.
- It integrates with tools you already use (CRMs, ATS, productivity apps), so your meeting data flows into your workflow.
You want to record your Whatsapp calls easily ? Download Noota app for free now : Android or IOS.
Meet the Writer
.webp)
Alexandre is the CEO of Noota. He has dedicated his life to helping sales reps and recruiters improve their work processes.
FAQ
Why doesn't WhatsApp have a built-in call recording feature?
WhatsApp's end-to-end encryption prevents native recording to protect user privacy.
- Only participants can access call audio by design
- Built-in recording would violate encryption promise and create legal risks
- Users must rely on device screen recorders or third-party apps
Can iPhone screen recording capture both sides of a WhatsApp call?
iPhone screen recording captures only your microphone audio, not internal WhatsApp audio from the other caller.
- iOS restricts internal audio capture for privacy reasons
- Speakerphone mode lets your mic pick up both sides
- Mac QuickTime connection provides better two-way audio control
What does Noota offer that WhatsApp screen recording does not?
Noota captures, transcribes, and structures calls automatically — screen recording only saves raw video files.
- AI note-taker generates structured interview notes and action items instantly
- Direct ATS integration and CRM sync — no manual file uploads
- Saves 6.4 hours per week per team member on admin work
Is it legal to record WhatsApp calls without telling the other person?
Recording laws vary by country — many require all-party consent before recording any call.
- EU and UK typically require explicit consent from all participants
- US laws vary by state: some allow one-party, others require all-party
- Always inform participants and get verbal consent before recording
Which tool is best for recording and transcribing candidate interview calls?
Noota is purpose-built for interview transcription software with ATS sync and structured candidate profiles.
- Auto-generates structured interview notes with scoring and highlights
- Syncs directly to Greenhouse, Lever, and 20+ ATS platforms
- Reduces note-taking time by 60% and keeps 95% of interviews more focused
Try Noota free — no credit card needed.