Management
●
July 28, 2025
●
8 min reading
How to Annotate on Teams Meetings
Annotation turns passive screen shares into interactive moments.
It helps you explain, clarify, and align faster—especially in interviews, team syncs, or project reviews.
In this article, you’ll learn how to use built-in annotation tool.
Does Teams provide a built-in annotation tool?
Yes—Microsoft Teams offers a built-in annotation tool, and it's surprisingly powerful when used right.
This feature lets you draw, type, highlight, or drop sticky notes right on your shared screen during a live meeting. It’s a simple way to make your explanations clearer, get feedback faster, or run a collaborative session where everyone stays engaged.
The annotation tool is powered by Microsoft Whiteboard. It works directly within Teams—no need to open another app.
When can you use it?
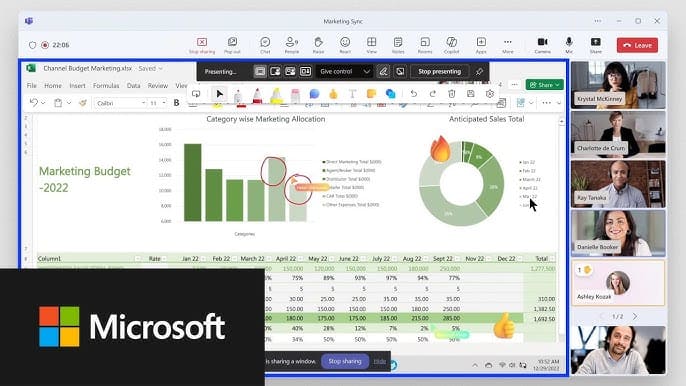
Annotation is available during screen sharing, but only when you share your entire screen, not a specific window or tab. Once you begin sharing, you’ll see a toolbar appear at the top. From there, you can start annotating with a single click.
The feature is available on the desktop app (Windows and Mac). If you’re using Teams on a browser, Chromebook, or mobile device, annotation may be limited or unavailable.
Who can annotate?
Only presenters can start annotation. If you’re the meeting host, you control who gets to participate. You can:
- Annotate by yourself.
- Allow others to annotate with you.
This is useful in interviews, training sessions, or feedback reviews. You decide whether you want the session to be collaborative—or just guided.
How does it work?
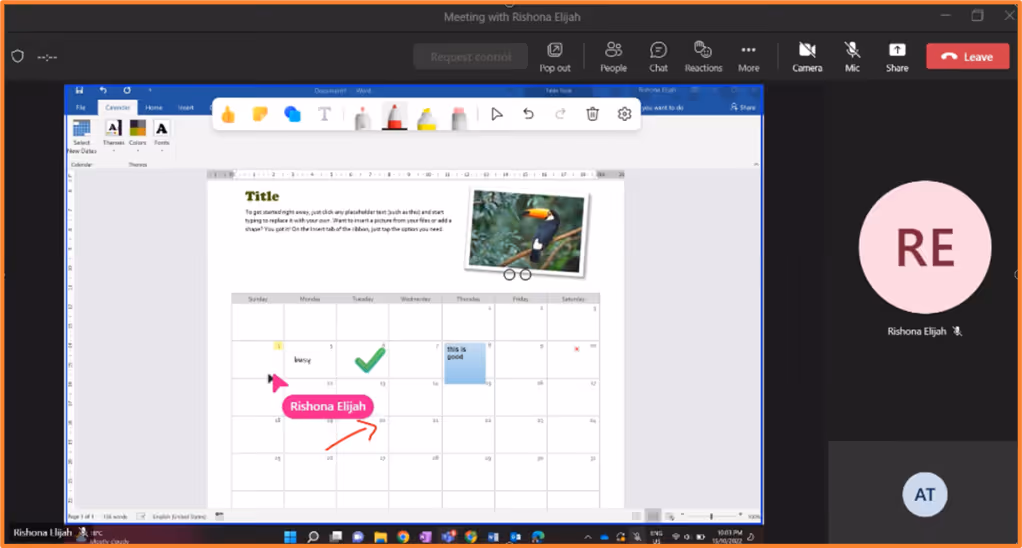
Once you activate annotation, Teams captures your screen in the background and opens a shared Whiteboard layer over it. You’ll see tools like:
- Pen and highlighter – for quick sketches or emphasis.
- Text boxes – to label or comment.
- Sticky notes – to add comments or quick thoughts.
- Laser pointer – to guide attention as you talk.
- Shapes and emojis – for visual clarity and quick reactions.
- Undo / Redo / Clear – to stay in control.
- Share / Exit – to end annotation and return to standard screen sharing.
You can switch between interacting with the shared content and using annotation mode—without stopping your screen share.
How to annotate on Teams step by step
Annotating in Microsoft Teams isn’t hard—but it only works if you follow a few specific steps. It’s not available by default in every setup, so you’ll want to check your settings before starting.
Here’s a clear step-by-step guide to help you use annotation like a pro—on your next screen share.
1. Make sure Whiteboard and annotation are enabled
Before you open a meeting, check that annotation is turned on.
If you’re an admin:
- Go to the Microsoft 365 Admin Center.
- Under Settings > Org Settings > Whiteboard, make sure it’s turned on.
- If needed, activate Public Preview features for users or test groups.
If you’re a user:
- Open Microsoft Teams.
- Click on your profile picture > About > Public Preview.
- If annotation is available, you’ll see the option appear during screen share.
2. Start a Teams meeting
Now start or join your meeting as usual. If you're presenting, you’ll have access to the screen share options.
Only presenters can start annotation—so make sure you have presenter rights if you're in a larger call.
3. Share your entire screen
This part is important: annotation only works if you share your entire desktop, not just a single window.
- Click the Share icon (rectangle with an arrow).
- Under “Screen”, select Desktop.
- Start your screen share.
Once sharing, you’ll notice a floating toolbar at the top of your screen.
4. Start annotation mode
On the toolbar, you’ll see a pen icon labeled Start annotation. Click it.
Your screen will freeze (for other participants), and a blue border will appear—this tells everyone that annotation is now live.
Microsoft Teams will open a layer over your screen that functions like a shared Whiteboard.
5. Use the annotation tools
You now have access to a range of visual tools. Here's what you can use:
- Pen – Draw freely or underline key points.
- Highlighter – Emphasize without covering content.
- Text box – Add quick comments or label ideas.
- Sticky notes – Leave thoughts without disrupting flow.
- Shapes and lines – Draw attention to specific areas.
- Laser pointer – Move your cursor to guide focus.
- Eraser – Clean up any mistakes.
- Undo / Redo – Fix things quickly.
- Clear all – Reset the screen in one click.
You can annotate solo or click the participant icon to allow others to draw with you.
6. Exit annotation mode
Once you're done, click Stop annotation on the toolbar. The screen unfreezes, and participants can see your live screen again.
Be aware: annotations are not saved automatically. If you want to preserve them, take a screenshot before exiting.
Teams Annotation FAQ

Here are the most common questions and clear answers to help you stay in control.
Can participants annotate in a Teams meeting?
Yes—but only if you give them permission.
By default, only the presenter (the person sharing their screen) can annotate. But if you want a more interactive session, you can allow others to join in.
When annotation mode is active:
- Click the Participants icon in the top-right of the toolbar.
- Toggle the setting to Allow everyone to annotate.
Now everyone can draw, highlight, and comment with you in real time.
Tip: Use this in small, focused meetings—like design reviews or collaborative planning. In large calls, too many people annotating at once can get chaotic.
Why can’t I see the annotation option?
This is a common blocker—and there are several reasons why annotation might be missing.
Here’s what to check:
- You’re not using the desktop app. Annotation only works in the full Teams desktop app. It won’t appear in the browser or mobile versions.
- You shared a window—not your screen. Annotation requires that you share your entire desktop, not a single app.
- Your IT admin hasn’t enabled it. Annotation relies on Microsoft Whiteboard. If it’s disabled in your Microsoft 365 settings, the feature won’t appear.
- You’re not in Public Preview. Some versions of Teams require enabling preview features to access annotation.
To fix this, switch to the desktop app, enable preview, and share your full screen.
Can I annotate on mobile?
Not yet. While mobile participants can view annotations live, they can’t initiate or contribute annotations from a phone or tablet.
Only desktop presenters can start and lead annotation sessions. That includes Windows and macOS.
Are annotations saved automatically?
No—annotations disappear once you exit the mode. Teams doesn’t currently save them by default, and they aren’t included in meeting recordings.
If you want to keep a visual record:
- Take a screenshot before exiting annotation mode.
- Use a third-party tool (like Snipping Tool or CleanShot) to capture and save your work.
This is important if you’re using annotations for interview feedback, coaching notes, or visual decisions.
Why aren’t annotations showing in the meeting recording?
Annotations are not recorded in Teams. Even if you see them live, they won’t appear in the playback. The recording only captures what’s visible before and after annotation.
To preserve the annotated content, take a screenshot—or use a meeting assistant like Noota to capture visuals and summaries in real time.
Noota: Automated Teams Annotation

Manual annotation has its limits. You draw something during a meeting, but it’s gone the moment you stop sharing.
That’s where Noota comes in.
✅ Detailed Meeting Notes
Noota record everything that has been said. Noota identifies all points and moments and timestamps those moments in the meeting summary.
✅ Action items and decisions—automatically captured
No need to interrupt a flow to type “Let’s do that by Friday.” Noota detects decisions, follow-ups, and assigned tasks from the conversation—and logs them with any related visuals or annotations.
✅ Exports to your tools
After the call, send the full meeting summary—including timestamps, transcript, and visual annotations—to Notion, Slack, your CRM, or ATS. No more chasing notes. Everything’s right where you need it.
✅ Search by what you showed
Looking for the meeting where you annotated a workflow or circled a mistake? Just type a keyword. Noota pulls up that moment—with the drawing, the transcript, and the action.
You want to keep detailled record of your Teams meetings ? Try Noota for free now.
Meet the Writer
.avif)
Adesh Sonawane explores how teams can better capture knowledge and collaborate more effectively with AI
FAQ
Can you annotate on Teams when sharing a single window?
No — Teams annotation only works when sharing your entire screen, not individual windows or tabs.
- Annotation toolbar appears only in full-screen share mode
- Window-specific sharing blocks the annotation feature completely
- You must switch share modes to enable annotation
Is Teams annotation available on mobile or browser?
Teams annotation is limited to desktop apps on Windows and Mac — browser, Chromebook, and mobile users cannot access it.
- Browser version lacks annotation toolbar entirely
- Mobile apps do not support Whiteboard integration
- Remote teams need desktop access for annotation features
What does Noota offer that Teams annotation does not?
Noota auto-generates meeting notes, action items, and summaries — Teams annotation only lets you draw on shared screens.
- Noota AI note-taker captures every discussion automatically with 80+ transcription languages
- AI action items extract tasks without manual tagging
- Noota saves 6.4 hours per week per team member on admin work
Who should use Teams annotation versus an AI meeting assistant?
Use Teams annotation for live visual collaboration — use an AI meeting assistant for automatic meeting notes and follow-up.
- Annotation works for design reviews and live feedback sessions
- AI notetakers handle interviews, sales calls, and recurring syncs
- Most teams need both for complete meeting productivity
Which tool is best for automatic meeting notes in Teams?
Noota is the best AI meeting assistant for Teams — it auto-generates notes, summaries, and action items with 95% user satisfaction.
- AI meeting summarizer delivers structured summaries in seconds
- Works across Teams, phone calls, and email in one platform
- Saves 6.4 hours per week with 80% less admin work
Try Noota free — no credit card needed.