Management
●
July 28, 2025
●
8 min reading
Decision Log : a Guide with Template

You make important decisions every week. Sometimes even every day.
But here’s the problem—most of those decisions get lost. That’s where a decision log comes in.
In this article, you’ll learn what a decision log is and get a decision log template.
What is a decision log?
A decision log is a structured document you use to record key decisions made within your team or project. It clearly captures important details: who made the decision, when they made it, and the reason behind the choice.
Without a decision log, important choices are easy to forget. People move between teams, or simply forget why a certain path was chosen. Soon, debates that your team already settled can resurface, costing you valuable time.
A clear decision log helps avoid this. It keeps everyone aligned, accountable, and efficient.
Your decision log typically includes several key details:
- Decision ID: Each decision gets a unique reference number. It helps you quickly find past decisions.
- Date: When was the decision made?
- Decision-makers: Who exactly made the call?
- Context: Why was this decision needed?
- Description: What was the decision?
- Rationale: Why did your team choose this solution?
- Alternatives: What other options did you consider?
- Impact: What will the effects of this decision be?
- Next Steps: What action items follow from the decision?
Decision log templates

Using a standard template makes logging decisions faster and easier.
You can copy, paste, and personalize it directly into Excel, Google Sheets, Notion, or your favorite productivity tool. Or download our Excel template here.
Decision ID: [Enter unique decision number]
Date: [Enter decision date]
Decision-maker(s): [Enter name(s) of person(s) who made decision]
Context:[Briefly describe why you needed to make this decision. Include relevant background or problem you wanted to solve.]
Decision description:[Clearly explain the actual decision you made.]
Rationale:[Explain why you made this decision. What benefits did you consider? What made this the best choice?]
Alternatives considered:
[Option 1: Brief description of alternative.][Option 2: Brief description of alternative.][Option 3: Brief description of alternative.]
Impact:[Explain what changes or outcomes this decision will have on your team, project, or stakeholders.]
Next Steps:
[Action item 1: Clearly outline your next action.][Action item 2: Clearly outline your next action.][Action item 3: Clearly outline your next action.]
Decision Status: [Open / In Progress / Completed / Archived]
Best practices to use a decision log

Here are the best practices to get the most out of your decision log.
1. Use a consistent format
Don’t reinvent the wheel every time. Use the same template for every entry.
Why? It keeps things organized. Everyone knows where to look for the rationale, the impact, or the next steps. Whether your team uses Excel, Google Sheets, Notion, or Airtable—stick to one clear structure.
You can personalize the format slightly for different teams, but keep core fields the same. That includes: decision description, context, rationale, and next steps.
2. Log decisions as soon as they happen
Don’t wait until the end of the week. Log each decision right after the meeting or discussion.
The longer you wait, the more details get lost. You forget who exactly made the decision. The reasoning behind the choice fades. And you’re left trying to reconstruct what happened from memory or email threads.
3. Assign ownership to every decision
Every decision should have a name attached to it. Not just the team. Not the department. A specific person.
Why? Because ownership drives follow-through.
When decisions are tied to people, you reduce ambiguity.
4. Share your decision log openly
A decision log is not just for you. It’s a team tool.
Make your decision log accessible to your whole team—or even your whole organization, if the decisions are relevant. Use a shared doc or workspace that everyone can view. Add it to your team wiki or project dashboard.
5. Review it regularly
Don’t just fill out your decision log and forget it.
Review it often—weekly or bi-weekly is ideal. Check that action items are being followed. Update statuses. Archive old decisions that are fully resolved.
If you don’t review your log, it becomes outdated fast. And your team stops trusting it.
6. Integrate it with your workflow
Integrate them directly into your current tools and processes. Add a “Decision Log” section at the bottom of your meeting notes. Or embed a live log in your Notion workspace or project management tool.
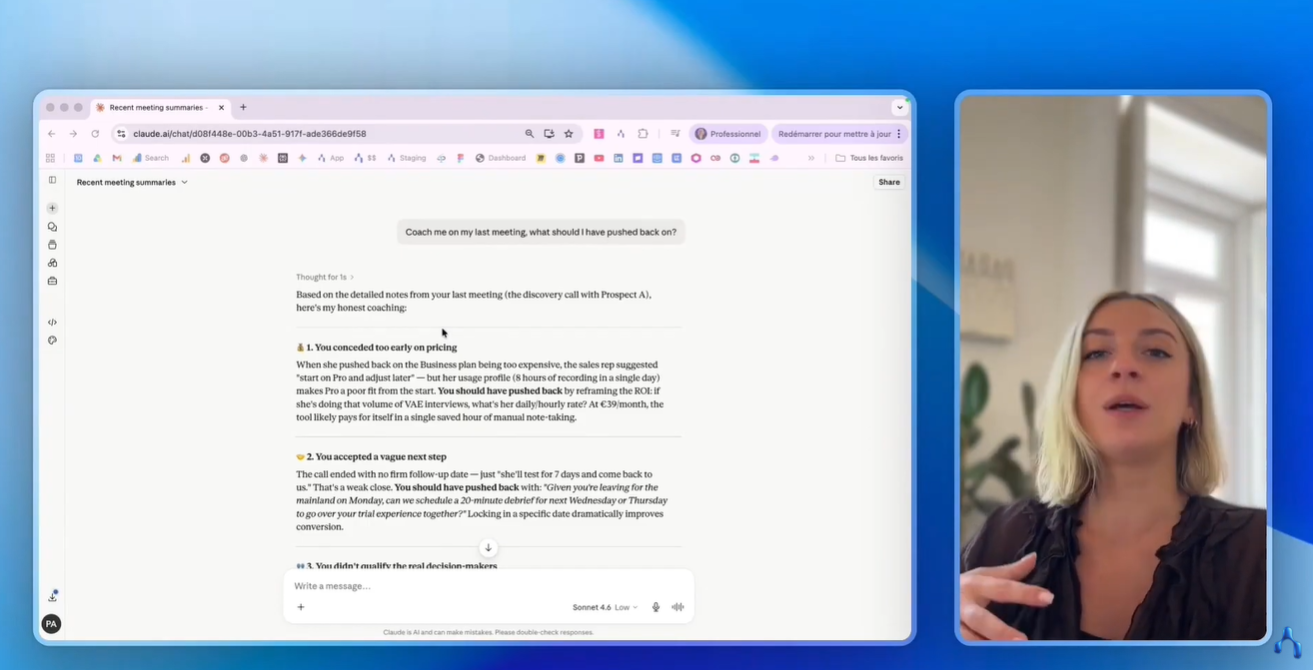
If you use meeting software like Zoom or Google Meet, tools like Noota can automatically capture decisions and feed them into your log.
Automated decision log: Noota
Manually updating a decision log can be a hassle. After a long meeting, the last thing you want is to open a spreadsheet and start typing.
That’s where Noota helps.
✅ Real-time transcription
Noota captures your meetings live—on Zoom, Teams, Google Meet, or in person. Every word is transcribed and time-stamped.
✅ Automatic decision detection
Noota’s AI picks up on key phrases like “Let’s go with...”, “We decided to...”, or “The plan is to...”
It highlights these moments and logs them as decisions.
✅ Structured meeting summary
After your call, Noota gives you a summary with decisions clearly listed. You can copy them directly into your log—or export them with one click.
✅ Searchable history
Can’t remember when you made a specific choice? Just search by keyword in Noota.
Find every meeting where you discussed “ATS,” “budget,” or “interview scorecards” in seconds.
✅ Team sharing and collaboration
You can share decision highlights with your team. No need to send full transcripts—just the parts that matter.
It’s perfect for looping in people who missed the meeting.
✅ Integrates with your tools
Export decisions to Notion, Slack, your CRM, or any tool you use daily.
It fits right into your workflow.
Want to try it for yourself? Get started with Noota for free.
Meet the Writer
.webp)
FAQ
What should be included in a decision log?
A decision log should capture decision ID, date, decision-makers, context, description, rationale, alternatives considered, impact, and next steps.
- Unique ID helps you reference past decisions quickly
- Rationale prevents teams from reopening settled debates
- Next steps turn decisions into accountable action items
How do you maintain a decision log without slowing down meetings?
Manual decision logs require someone to fill templates during or after every meeting — most teams abandon them within weeks.
- Automatic meeting notes eliminate manual logging entirely
- Noota extracts decisions from transcripts in real time
- Teams save 80% on administrative work with auto-capture
What does Noota offer that manual decision logs do not?
Noota auto-captures decisions from meetings, calls, and emails — no manual template filling required.
- AI meeting summarizer extracts decisions with context and rationale automatically
- Knowledge Hub makes every past decision searchable across all conversations
- Teams save 6.4 hours per week on admin work
Why do decision logs fail in most teams?
Decision logs fail because manual logging takes time, gets forgotten, and creates inconsistent entries across team members.
- People skip logging during fast-paced meetings
- Templates vary between team members without enforcement
- Past decisions become unsearchable in scattered documents
Which tool is best for tracking decisions across meetings and calls?
Noota is the best AI meeting assistant for decision tracking — it auto-captures decisions from meetings, calls, and emails with full context.
- AI meeting minutes log every decision automatically
- Searchable knowledge base across 100,000+ active users
- Saves 6.4 hours per week per team member
Try Noota free — no credit card needed.