Management
●
September 29, 2025
●
8 min reading
Record on FaceTime : a Step-by-Step Guide

Chances are, you wished you could hit “replay” later to double-check the details on FaceTime.
The challenge? FaceTime doesn’t make recording straightforward.
This guide will walk you through every option in details.
Does FaceTime have a built-in recording feature?
You might hope for a “Record” button right inside FaceTime, but in most cases, it doesn’t exist. Apple has long avoided integrating a full native call-recording function in FaceTime—especially for video calls—primarily for privacy and legal reasons.
However, there is a more recent wrinkle for FaceTime audio calls. Starting with iOS 18.1, Apple has begun supporting call recording (for audio) in select regions. Phones and Macs, when you’re in a one-to-one audio FaceTime call and your locale allows it, you may see an option called Call Recording under the “More” menu. Both parties are automatically notified when recording begins.
Still, the availability is limited. Many countries—especially in the European Union—do not support FaceTime’s built-in recording capabilities. If you live in one of those regions, you won’t see the option at all.
So what does this mean for your use cases?
- For video calls: there’s no built-in FaceTime feature that reliably captures both video and audio. Apple’s own screen recorder can capture the video, but internal audio is almost always excluded.
- For audio calls, you might have a built-in option—but only if your region supports it, and the feature is enabled on your device.
How to record FaceTime call step by step
Choose the approach that fits your device and whether you need video + audio.
2.1 On iPhone / iPad
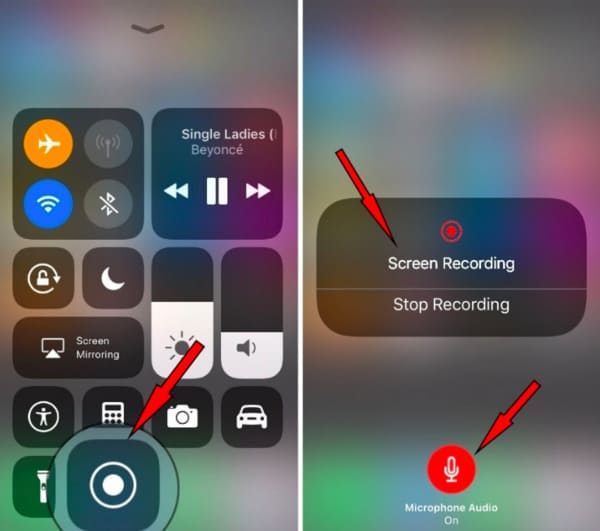
Using iOS’s built-in Screen Recording
- Go to Settings → Control Center → Customize Controls. Add Screen Recording if it’s not already there.
- Swipe to open Control Center (top-right corner on newer iPhones).
- Long press (or tap and hold) the Screen Recording icon to open options. Turn on Microphone Audio.
- Tap Start Recording. Wait for the three-second countdown.
- Exit Control Center and start your FaceTime call.
- When done, tap the red status bar or return to Control Center and stop the recording. The video (with your mic audio) is saved to the Photos app.
⚠️ Important limitation: even with microphone enabled, iOS screen recording typically does not capture the other person’s internal audio. You’ll get your voice via the mic, and perhaps ambient sound, but not both sides clearly.
Using a third-party VoIP / call recording app (e.g. Cube ACR, Call Recorder apps)
- Install a trusted recorder from Apple Store (e.g. Cube ACR or Noota).
- Open the app, grant all required permissions (microphone, storage, “draw over other apps” or accessibility) as prompted.
- In its settings, enable VoIP / WhatsApp call recording.
- Initiate your WhatsApp call. The recorder should auto-detect and begin capturing audio.
- After the call, open the recorder app to locate the file, rename it, or share as needed.
2.2 On Mac / macOS
Recording FaceTime on a Mac offers more flexibility, especially when you want to capture both video and audio.
Method A: Built-in macOS screen recording (Command + Shift + 5)
- Start your FaceTime window (video or audio).
- Press Cmd + Shift + 5 to bring up the macOS screenshot / recording toolbar.
- Choose whether to record entire screen or record selected portion (e.g. FaceTime window).
- Click Options, then under Microphone, select Built-in Microphone (or another mic) to capture your voice.
- Hit Record, then place your FaceTime call.
- To stop, click the Stop button in the menu bar. The video file (with your mic audio) is saved to your default folder (often Desktop or Movies).
Method B: QuickTime + audio routing tools (for full audio capture)
- Open QuickTime Player → File → New Screen Recording.
- Next to the red record button, use the dropdown arrow to select your audio input (e.g. a virtual audio device or aggregate device combining system and mic).
- If you want to capture internal audio (the other side of conversation), you’ll often need a tool like BlackHole, Loopback, or Soundflower to route system audio into your recording.
- Press record, then start your FaceTime call.
- Stop when done, and save the file.
Method C: Record iPhone screen from Mac (for mobile FaceTime calls)
If you’re using FaceTime on iPhone but want to capture it on Mac:
- Connect your iPhone to your Mac via a USB cable or use Continuity.
- In QuickTime, choose File → New Movie Recording, then select your iPhone as video source.
- Click record in QuickTime, then start FaceTime on your iPhone.
- Stop when done. You’ll capture the iPhone’s screen (video) and your mic audio.
2.3 External / hardware method
When software solutions fail or don’t give you clean audio, fallback to hardware:
- Put the FaceTime call on speaker on iPhone, iPad, or Mac.
- Use a second device (phone, tablet, recorder) placed nearby to capture both sides of audio.
- Optionally, after the call, you can sync video and audio tracks in editing tools.
- Save and label your recording carefully.
FaceTime Recording Troubleshoot
Even when you follow the steps carefully, issues may still arise. Below are common problems and fixes you can try to make sure your FaceTime recordings include both video and audio.
3.1 Silent recording / no audio captured
What’s going wrong:
- iOS may block internal audio during screen recording, especially for calls.
- You didn’t enable the microphone in the screen recording controls.
- Permissions for microphone access are disabled for FaceTime or the recorder app.
Fixes you can try:
- Before you start recording, long-press the screen recording icon and turn on Microphone Audio.
- Go to Settings → Privacy → Microphone and ensure FaceTime (or the recording tool) has permission.
- Restart your device to clear potential temporary glitches.
- Reset all settings (Settings → General → Transfer or Reset → Reset All Settings). This won’t delete your data but can fix hidden configuration issues.
- Update iOS or macOS to the latest version to patch known bugs.
3.2 One-sided or partial audio
Sometimes you’ll hear only your side of the call, or the other party is silent in the recording.
Causes & solutions:
- Your mic is capturing only your voice. Try speakerphone mode so the recorder “hears” both voices.
- The system may automatically mute in-call internal audio (common on iOS).
- Use a Mac setup or routing tool to capture both system audio and microphone when you need two sides clearly (via virtual audio devices or aggregate device).
- Check that no other app is monopolizing the microphone at the same time.
3.3 Permissions, settings, and misconfigurations
Even small settings can block recording.
Trouble signs:
- Microphone access is turned off
- Battery optimization kills background recording
- The screen recorder app is not allowed to “draw over other apps” (for floating controls)
What to do:
- Head to system settings and confirm the recorder app and FaceTime have mic and storage access.
- Exclude the recorder app from battery/sleep optimizations.
- Grant overlay or “allow on top” permissions if your recorder needs it.
- On Mac, check Privacy & Security → Microphone and ensure the app is allowed access.
3.4 Low quality, noise, or distortion
Recording works, but sound is muffled or unclear.
Likely causes:
- Background noise or echo
- Microphone is blocked (by your case or positioning)
- You are too far from your device’s mic
Tips to improve audio:
- Use a quiet room, turn off fans or background sounds
- Keep the mic unobstructed and speak clearly
- Use a wired or high-quality mic if possible
- Reduce distance between speakers and the mic
3.5 Recording cut off, file not saved, or crashes
Sometimes the recording stops unexpectedly or fails to save.
Reasons:
- Device ran out of storage
- Auto-sleep or screen lock kicked in
- Recorder app crashed or was closed by system
Fixes:
- Free up storage space before starting
- Adjust auto-lock settings (e.g. temporarily disable screen lock)
- Record in shorter segments rather than long continuous sessions
- Use a stable, high-performance recording app or tool
All-in-one call recording tool: Noota
When you’re tired of toggling tools, chasing file exports, or fighting poor audio, Noota steps in to simplify everything.
- Noota records live audio and video calls, including in-person meetings, and transcribes everything in real time.
- It delivers an auto-generated summary, extracting decisions, action items, and key insights so you don’t have to scrub through full transcripts.
- Your recordings and transcripts become searchable and indexed, letting you jump directly to what matters.
- It supports robust integrations (CRM, ATS, calendars) so your call data flows right into your workflow.
- On the security side, Noota stores data in EU data centers under full encryption, aligning with GDPR and enterprise standards.
You want to record your Facetime calls easily ? Download Noota app for free now : IOS.
Meet the Writer

Jean-marc is an AI expert helping recruiters & professionnals leverage these tools in their everyday work processes.
FAQ
Does FaceTime's built-in call recording work for video calls?
No — FaceTime's native recording only supports audio calls, and only in regions outside the EU starting with iOS 18.1.
- Video calls have no built-in recording option
- Audio recording auto-notifies both participants when started
- Feature unavailable in most European countries due to privacy laws
Why doesn't iOS screen recording capture the other person's audio on FaceTime?
iOS screen recording blocks internal app audio by design — you only get your own mic input, not the caller's voice.
- Apple restricts internal audio capture for privacy reasons
- You'll record video and your voice, but not both sides
- Makes screen recording useless for documentation or compliance needs
What does Noota offer that FaceTime recording does not?
Noota records both sides of any call with automatic transcription, summaries, and CRM sync — FaceTime offers none of this.
- AI note-taker generates searchable transcripts in 80+ languages
- Saves 6.4 hours per week per team member on admin work
- Works across video meetings, phone calls, and email — not just FaceTime
Can third-party apps reliably record FaceTime calls with both audio streams?
Most third-party apps face the same iOS audio restrictions — they capture your mic, not the other caller's internal audio.
- VoIP recorders work for WhatsApp or Zoom, not FaceTime
- Mac offers more flexibility with system audio capture tools
- Best AI notetaker solutions bypass FaceTime entirely with native call recording
Which meeting transcription software works best for teams that need reliable call recording?
Noota is the best AI meeting assistant for teams — it records meetings, phone calls, and emails with automatic transcription and CRM sync.
- 80% reduction in administrative work across all conversations
- Business telephony built in — no FaceTime workarounds needed
- 95% of users say Noota keeps meetings more focused
Try Noota free — no credit card needed.